How To: Fit a VR4 4g63 engine
Posted: Thu Apr 28, 2011 4:30 pm
Fitting a VR4 engine into a Sigma or Galant is a much talked about upgrade. Whenever anyone asks about fitting a newer, more powerful engine into an older Mitsu the answer is generally "get a VR4 - it bolts straight in" Indeed it can bolt in, but there is quite a lot of work involved that doesn't seem immediately obvious.
Having recently put one in my GH Sigma that originally had a 2.0 litre I found out some of what is involved - and I took the easy way out buy getting an engine that had already been set up for RWD. I'll try and break it into sections and include (dodgy edo spec ) pics where possible. This is by no means the only way to fit these engines, just how I have done it. I have the engine fitted in same spot as the original with no mods required to the firewall, etc.

The Engine
Make sure you are getting a VR4 engine, and not one out of an RVR or an Evo. The VR4 has a 6 bolt crank that matches the Sigma flywheel. The others do not. The main areas that will need modifying to fit it are the inlet plenum/throttle body, thermostat housing, CAS and the turbo/exhaust manifold.
Gearbox + Clutch
This is one part of the job that can actually be "bolt in". The bellhousing pattern matches up perfectly with the narrow Sigma pattern. This means that if you have a manual box off a 2.0 litre (and possibly 1.6's) then it will bolt straight onto the back of the engine. If you have the right engine with the 6 bolt crank then the Sigma 2.0 flywheel, pilot bearing, bearing spacer and so on will also bolt straight on. A heavy duty clutch will probably be required to handle the extra power - but if it fits a Sigma then it will fit the VR4 with the Sigma flywheel. The only part of this whole section that doesn't bolt up is the metal plate sandwiched between the engine and bellhousing. You will need to use a sigma one but the holes for the 2 small bolts that hold it to the block don't line up. You could modify it to suit but once the box is on it won't go anywhere anyway.
Starter Motor
I have kept the starter separate from the gearbox as it is one part that almost caught me out. I went to fit the VR4 starter only to find that it didn't want to tighten up flush against the bellhousing. The body was too big a diameter and was hitting the side of the block. The sigma starter is a smaller diameter so it fitted great, and still starts the engine with no problems.
Engine Mounts
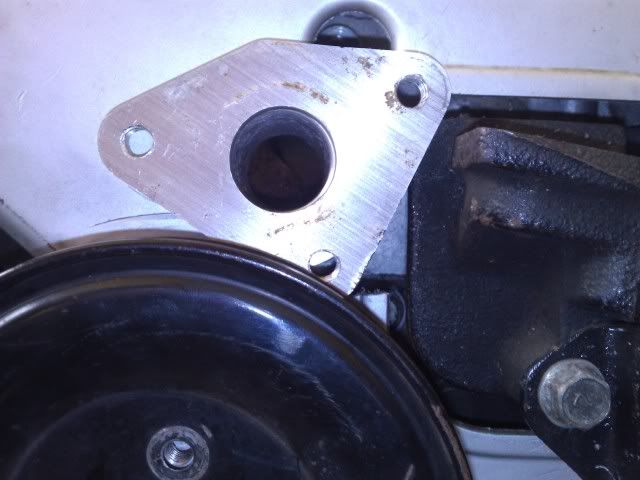
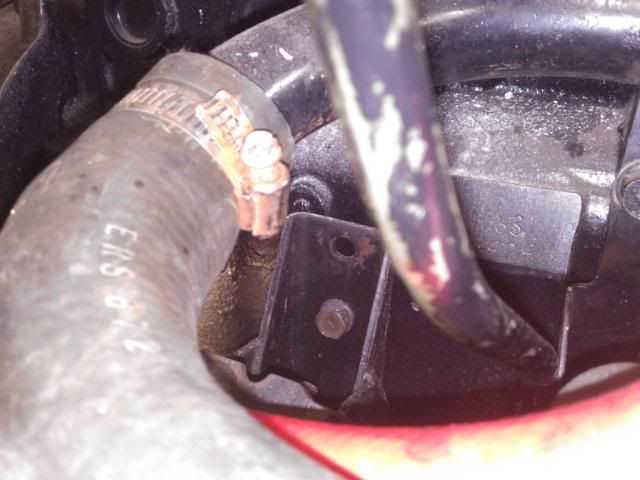
This is one section that seem to confuse a lot of people. The engine I got came with a set of dodgy looking mounts that had been made to move the engine forwards about 50mm. This had been done to allow room behind the engine for the thermostat, but caused other issues with the steering and so on. The way i have fitted the engine this isn't necessary. I originally got a pair of Starion engine brackets (other RWD 4G63 brackets out of an L200 etc may also work) These will bolt straight onto the engine block, and straight onto the sigma rubber mounts. Only problem was one was bent. But this led to another finding. The bracket off the exhaust side of an Astron will fit great if you drill 1 extra hole. I could have trimmed it down and made it neater but I was in a hurry that afternoon.
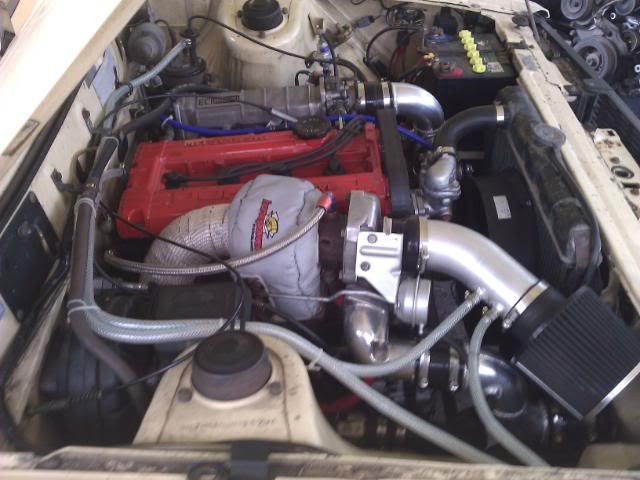
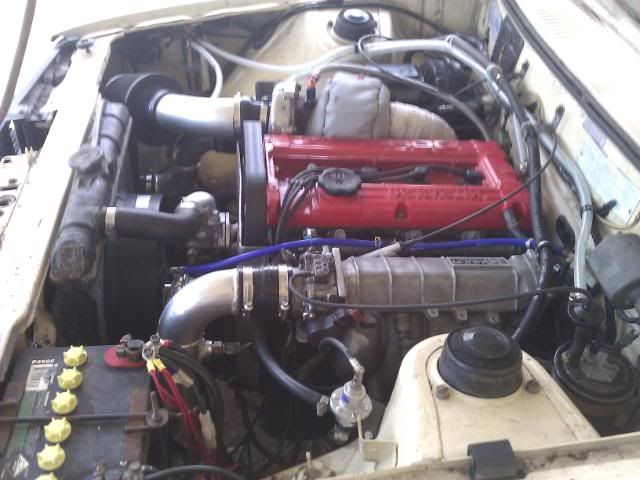
Inlet manifold + Throttle Body
The problem with the maniold is pretty obvious. The throttle body is on the wrong end. Easiest fix is to block off the open end with a plate (this can be used later on to fit vacuum fittings, etc if you want.), then have someone weld a new flange onto the other end. The standard VR4 throttle body has a very restrictive looking elbow that bolts to the front of it. After a quick Google search I found out this is commonly swapped with the throttle body off a later 4g63 or TR Magna which is slightly bigger and has a more conventional style that will allow a 70mm hose to be clamped onto it. Picked one up off ebay for a couple of dollars and swapped it over, blanking off the pollution stuff on the bottom at the same time.
Exhaust Manifold/Turbo
I can't really go into much detail here as my engine has had the exhaust manifold cut and welded to convert it to a high mount manifold before I got it. With the standard setup the turbo will foul against the steering box. I have heard that the turbo can simply be rotated to get the clearance required though I'm not 100% sure on this. By making it a high mount setup you will have more room for the lower radiator hose (at least the way I have done it). For the oil feed line from the back of the head I have used a speedflow banjo fitting to give me as much clearance as possible from the firewall.
CAS
The Crank Angle Sensor is another area I can't really comment on. Mine has been removed and now runs a trigger wheel on the crank itself. The engine has to be run off an aftermarket computer to do this.
Thermostat Housing
I thought this would be an easy job when i found this JayRacing kit http://www.jayracing.com/index.php?main ... ucts_id=28. It fits into the head where there was originally a welsh plug.
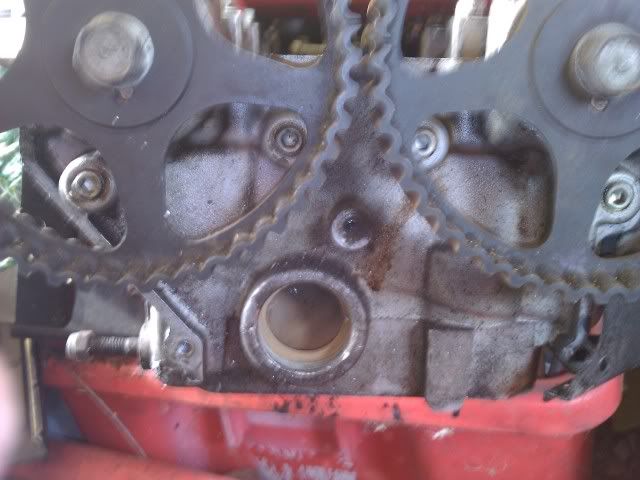
However after receiving it and attempting to fit it I realised that it doesn't clear the water pump pulley. The rear block off plate fitted fine though. In the end i had it modified so that it comes out of the head at a 30degree angle rather then straight, giving me just enough clearance from the pulley. You will however need to remove a decent amount off the old mount that sticks out the timing cover in order to do this.
In addition to this the top of the housing was rotated slightly so the outlet was 90degrees to the engine/radiator. It then fits up to the standard radiator using a cut down section from the original Sigma top hose. You will need to use a thermo fan as there is no where on the engine that you can really mount a mechanical fan.
Lower Radiator Hose
For the lower radiator hose the metal inlet pipe into the back of the water pump was bent 90 degrees under the exhaust manifold. A 90 degree section of hose (05-0434 off a landcruiser) then brings it up past the the alternator. It then joins into a 'S' bend section off hose which connects to the original radiator.
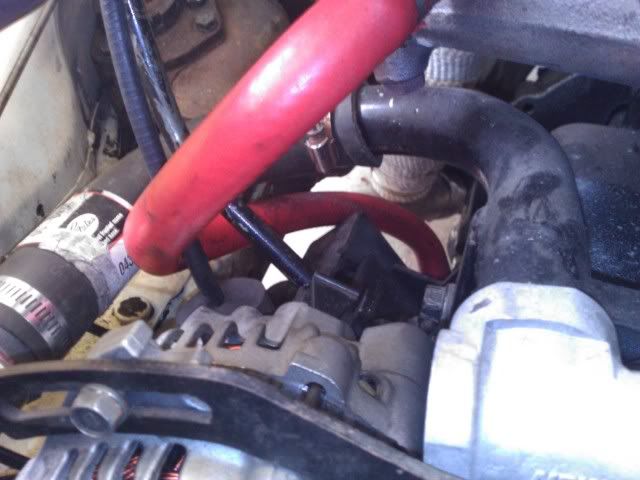
Alternator + Wiring
I used the VR4 alternator as it is already fitted to the engine, and it has a much higher output compared to the original. Only problem is it is on the other side of the engine bay, and has an extra wire. I started out by stripping back the harness from the battery, starter etc all the way back to where it goes into the firewall. For the main power from the alternator I ran an 8g cable from the alternator to the battery. The original was cut off where it joined the loom. The other original wire to the alternator (charge light) was then relocated down the other side of the engine bay to connect to the smaller diameter of the 2 wire that plug into the new alternator. The other wire that plugged into the new alternator (voltage sense?) was attached to the main power cable in the loom similar to the original main power from the old alternator.
Fuel System
Nothing special here, just your usual lift pump, surge tank and high pressure pump that you would find in any EFI conversion. Just make sure the pumps can flow enough to supply the engine with enough fuel.
Intercooler + Piping
For the intercooler i was looking at using either a 600x300 unit (would need a fair bit of modding) or a 450x300 (should fit a lot easier). In the end I ended up with one out of an Evo 7. This was the perfect width to fit great apart from the inlet and out lets, and looks like a factory radiator when painted black. I cut off the original pipes had some tight radius bends welded to the tanks. I had to enlarge the bumper bracket holes and modify the bonnet catch bracket but done carefully it all looks almost factory. I then used 2 1/2" alloy piping to the turbo and throttle body.
That's pretty much all the main issues covered I think. I haven't really gone into wiring as I have used an aftermarket computer. Depending on what computer you use things could be a lot different. I was able to do nearly the whole conversion myself in a carport - the only work i couldn't do myself was the aluminium welding and the exhuast manifold. Some welding was also required for the intercooler brackets and the bonnet catch bracket, but this would all depend on what intercooler you use.
If you have any questions feel free to ask, and if you have any suggestions on other ways to fit the engine then your input would be appreciated. This is still very much a work in progress so you will have to forgive the messy and dirty engine bay.
Having recently put one in my GH Sigma that originally had a 2.0 litre I found out some of what is involved - and I took the easy way out buy getting an engine that had already been set up for RWD. I'll try and break it into sections and include (dodgy edo spec
The Engine
Make sure you are getting a VR4 engine, and not one out of an RVR or an Evo. The VR4 has a 6 bolt crank that matches the Sigma flywheel. The others do not. The main areas that will need modifying to fit it are the inlet plenum/throttle body, thermostat housing, CAS and the turbo/exhaust manifold.
Gearbox + Clutch
This is one part of the job that can actually be "bolt in". The bellhousing pattern matches up perfectly with the narrow Sigma pattern. This means that if you have a manual box off a 2.0 litre (and possibly 1.6's) then it will bolt straight onto the back of the engine. If you have the right engine with the 6 bolt crank then the Sigma 2.0 flywheel, pilot bearing, bearing spacer and so on will also bolt straight on. A heavy duty clutch will probably be required to handle the extra power - but if it fits a Sigma then it will fit the VR4 with the Sigma flywheel. The only part of this whole section that doesn't bolt up is the metal plate sandwiched between the engine and bellhousing. You will need to use a sigma one but the holes for the 2 small bolts that hold it to the block don't line up. You could modify it to suit but once the box is on it won't go anywhere anyway.
Starter Motor
I have kept the starter separate from the gearbox as it is one part that almost caught me out. I went to fit the VR4 starter only to find that it didn't want to tighten up flush against the bellhousing. The body was too big a diameter and was hitting the side of the block. The sigma starter is a smaller diameter so it fitted great, and still starts the engine with no problems.
Engine Mounts
This is one section that seem to confuse a lot of people. The engine I got came with a set of dodgy looking mounts that had been made to move the engine forwards about 50mm. This had been done to allow room behind the engine for the thermostat, but caused other issues with the steering and so on. The way i have fitted the engine this isn't necessary. I originally got a pair of Starion engine brackets (other RWD 4G63 brackets out of an L200 etc may also work) These will bolt straight onto the engine block, and straight onto the sigma rubber mounts. Only problem was one was bent. But this led to another finding. The bracket off the exhaust side of an Astron will fit great if you drill 1 extra hole. I could have trimmed it down and made it neater but I was in a hurry that afternoon.
Inlet manifold + Throttle Body
The problem with the maniold is pretty obvious. The throttle body is on the wrong end. Easiest fix is to block off the open end with a plate (this can be used later on to fit vacuum fittings, etc if you want.), then have someone weld a new flange onto the other end. The standard VR4 throttle body has a very restrictive looking elbow that bolts to the front of it. After a quick Google search I found out this is commonly swapped with the throttle body off a later 4g63 or TR Magna which is slightly bigger and has a more conventional style that will allow a 70mm hose to be clamped onto it. Picked one up off ebay for a couple of dollars and swapped it over, blanking off the pollution stuff on the bottom at the same time.
Exhaust Manifold/Turbo
I can't really go into much detail here as my engine has had the exhaust manifold cut and welded to convert it to a high mount manifold before I got it. With the standard setup the turbo will foul against the steering box. I have heard that the turbo can simply be rotated to get the clearance required though I'm not 100% sure on this. By making it a high mount setup you will have more room for the lower radiator hose (at least the way I have done it). For the oil feed line from the back of the head I have used a speedflow banjo fitting to give me as much clearance as possible from the firewall.
CAS
The Crank Angle Sensor is another area I can't really comment on. Mine has been removed and now runs a trigger wheel on the crank itself. The engine has to be run off an aftermarket computer to do this.
Thermostat Housing
I thought this would be an easy job when i found this JayRacing kit http://www.jayracing.com/index.php?main ... ucts_id=28. It fits into the head where there was originally a welsh plug.
However after receiving it and attempting to fit it I realised that it doesn't clear the water pump pulley. The rear block off plate fitted fine though. In the end i had it modified so that it comes out of the head at a 30degree angle rather then straight, giving me just enough clearance from the pulley. You will however need to remove a decent amount off the old mount that sticks out the timing cover in order to do this.
In addition to this the top of the housing was rotated slightly so the outlet was 90degrees to the engine/radiator. It then fits up to the standard radiator using a cut down section from the original Sigma top hose. You will need to use a thermo fan as there is no where on the engine that you can really mount a mechanical fan.
Lower Radiator Hose
For the lower radiator hose the metal inlet pipe into the back of the water pump was bent 90 degrees under the exhaust manifold. A 90 degree section of hose (05-0434 off a landcruiser) then brings it up past the the alternator. It then joins into a 'S' bend section off hose which connects to the original radiator.
Alternator + Wiring
I used the VR4 alternator as it is already fitted to the engine, and it has a much higher output compared to the original. Only problem is it is on the other side of the engine bay, and has an extra wire. I started out by stripping back the harness from the battery, starter etc all the way back to where it goes into the firewall. For the main power from the alternator I ran an 8g cable from the alternator to the battery. The original was cut off where it joined the loom. The other original wire to the alternator (charge light) was then relocated down the other side of the engine bay to connect to the smaller diameter of the 2 wire that plug into the new alternator. The other wire that plugged into the new alternator (voltage sense?) was attached to the main power cable in the loom similar to the original main power from the old alternator.
Fuel System
Nothing special here, just your usual lift pump, surge tank and high pressure pump that you would find in any EFI conversion. Just make sure the pumps can flow enough to supply the engine with enough fuel.
Intercooler + Piping
For the intercooler i was looking at using either a 600x300 unit (would need a fair bit of modding) or a 450x300 (should fit a lot easier). In the end I ended up with one out of an Evo 7. This was the perfect width to fit great apart from the inlet and out lets, and looks like a factory radiator when painted black. I cut off the original pipes had some tight radius bends welded to the tanks. I had to enlarge the bumper bracket holes and modify the bonnet catch bracket but done carefully it all looks almost factory. I then used 2 1/2" alloy piping to the turbo and throttle body.
That's pretty much all the main issues covered I think. I haven't really gone into wiring as I have used an aftermarket computer. Depending on what computer you use things could be a lot different. I was able to do nearly the whole conversion myself in a carport - the only work i couldn't do myself was the aluminium welding and the exhuast manifold. Some welding was also required for the intercooler brackets and the bonnet catch bracket, but this would all depend on what intercooler you use.
If you have any questions feel free to ask, and if you have any suggestions on other ways to fit the engine then your input would be appreciated. This is still very much a work in progress so you will have to forgive the messy and dirty engine bay.