My GC Hardtop project
Re: My GC Hardtop project
Ditto with Hotwire. Aero sports look more at home on a euro hatch. I think the lace rims have more street cred on an old school.

Re: My GC Hardtop project
Well, I agree on the comments on superlites (or any other rim of same style).
As for the wheels you're looking at, the meshies are a safe bet (we all know they are going to look nice a predictable on it) but the aero rims? I haven't got a clue what they would look like on a Galant? I'm not a fan of the writing on them, but I suppose that goes with the look? I also suppose they wouldn't be worth as much with the writing removed?
What size and offsets are they?
Dave...
If you want any sigma-galant.com stickers, then look here for how to get them sigma-galant.com stickers
Re: My GC Hardtop project
Why not buy both? 
I'm a fan of the Southern Ways, mesh is overdone.
I'm a fan of the Southern Ways, mesh is overdone.
-Josh.

Daily: 7/96 EF Falcon, 4.0 SOHC, BTR95LE, 3.45:1 LSD/Lukey extractors, full 2.5” exhaust, EL intake, Tickford snorkel, 87DA cam, AU injectors, shiftkits.com.au single stage kit. PB 14.93@91mph.
Project: Red '81 Scorpion-http://www.sigma-galant.com/viewtopic.php?f=46&t=11889
Daily: 7/96 EF Falcon, 4.0 SOHC, BTR95LE, 3.45:1 LSD/Lukey extractors, full 2.5” exhaust, EL intake, Tickford snorkel, 87DA cam, AU injectors, shiftkits.com.au single stage kit. PB 14.93@91mph.
Project: Red '81 Scorpion-http://www.sigma-galant.com/viewtopic.php?f=46&t=11889
Re: My GC Hardtop project
I am thinking that meshies have been way over done, every shitbox KE70 Corolla is sporting a set near me. Having said that, they are an awesome looking wheel.
I think the Southern Ways will look pretty cool, probably a bit Euro and certainly 80's but not something you see everyday.
The SSR's are 16x7 +15 and 16x7.5 +9 so will fill out the hardtop nicely
The Southern Ways are 15x7 +5 all 4 so should also fill the gaurds.
In the end I might just run semi's on the steelies all the time
Re: My GC Hardtop project
My seats on the their way 

In Transit [Sea / Container B]
Explanation: Your item has been packed into Import Monster container "B" which is now in transit. On average, containers take approx. 5-6 weeks to arrive in Australia & clear customs / quarantine. Any delays will be communicated via email. Otherwise, the next update you receive will be when the order has arrived to our Aussie warehouse in approx 5-6 weeks from the date of this update! Mark it in your diary!
Re: My GC Hardtop project
So got bored waiting for my seats and had nothing on tonight so I....
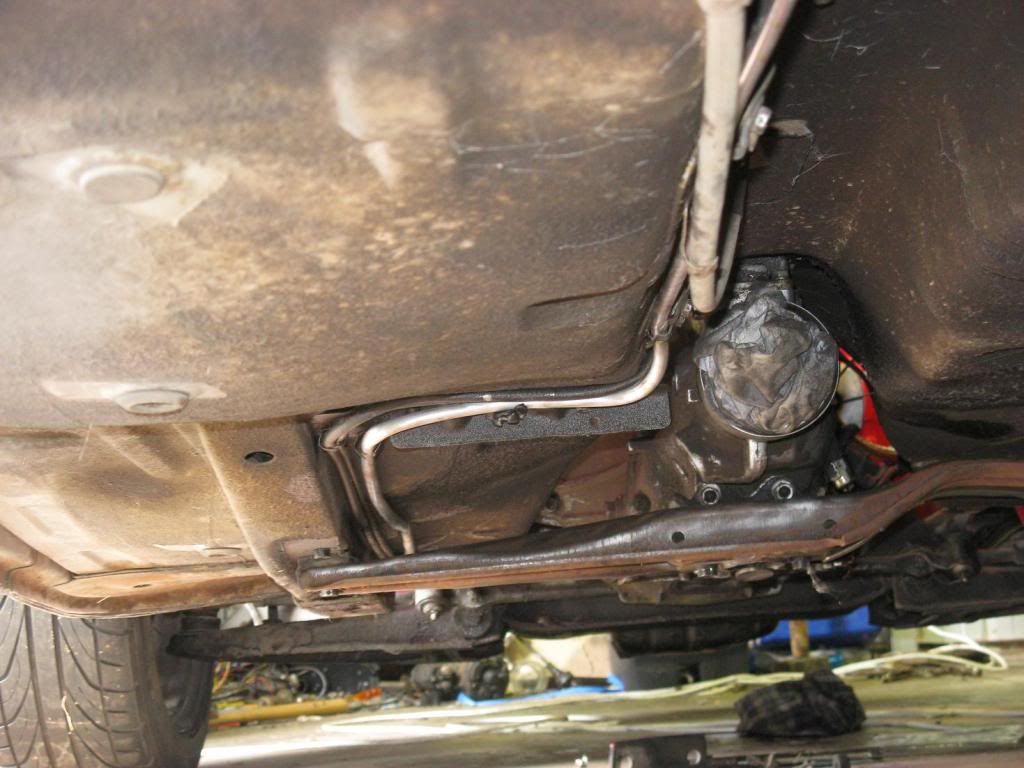
Ran a new fuel line from the cell to the carbies and fitted new super cool braided fuel hose
I forgot to get pics underneath, it won't be on it's wheels for long though
Used the same hose for the brake booster
I think this is what they call a bee's dick, lol
Nah should be fine
Fancy nolothane swaybar bushes
Thats about it for this weekend, I am flat out tomorrow and the boy is racing on Sunday.
Have a good weekend all")
Ran a new fuel line from the cell to the carbies and fitted new super cool braided fuel hose
I forgot to get pics underneath, it won't be on it's wheels for long though
Used the same hose for the brake booster
I think this is what they call a bee's dick, lol
Nah should be fine
Fancy nolothane swaybar bushes
Thats about it for this weekend, I am flat out tomorrow and the boy is racing on Sunday.
Have a good weekend all
Re: My GC Hardtop project
how much pressure was that fuel line rated to again? 

Re: My GC Hardtop project
LOL, the hose is temp only; I have spent this afternoon in a sea of speed flow fittings. I will fit it up correctly once I have the two way fitting for the first carby.
I just about have the fuel cell "hosed" up with speed flow and braid. Scored a sweet fuel pump from a mate I was helping out today along with a bag of fittings so will get stuck in to the fuel system over the next week.
Once that it done I need to run the battery cables to the boot. Once that is sorted I need some MDF to do my new boot floor so I can mount it all permanently in place.
I will get some pics in the morning; scrutineering isn't until 11:30 so I can mess around a bit in the morning
Re: My GC Hardtop project
Is this what I need to run from boot to engine bay?
http://www.ebay.com.au/itm/Battery-Lead ... 336a14adad
It seems too cheap to be correct
http://www.ebay.com.au/itm/Battery-Lead ... 336a14adad
It seems too cheap to be correct
-
amgis_obrut

- Posts: 1742
- Joined: Wed Mar 18, 2009 6:26 pm
- Location: Orient Point NSW
Re: My GC Hardtop project
I always use 0ga wire when the batts in the boot
GH Sigma, 16" Mesh wheels, sports steering wheel and a V8 exhaust
Re: My GC Hardtop project
Hey Mick, what is this Oga wire of which you speak?
eBay or Google didn't have the answers.
eBay or Google didn't have the answers.
Re: My GC Hardtop project
He means 0 'zero' gauge wire...
Re: My GC Hardtop project
Try JAYCAR jason, or alternately autobarn if you feel like paying more...
Re: My GC Hardtop project
Okay, so I get to the boat club this morning and Brandon is the only one there in his class, it is cold, raining and windy as hell. We were home 20 minutes later
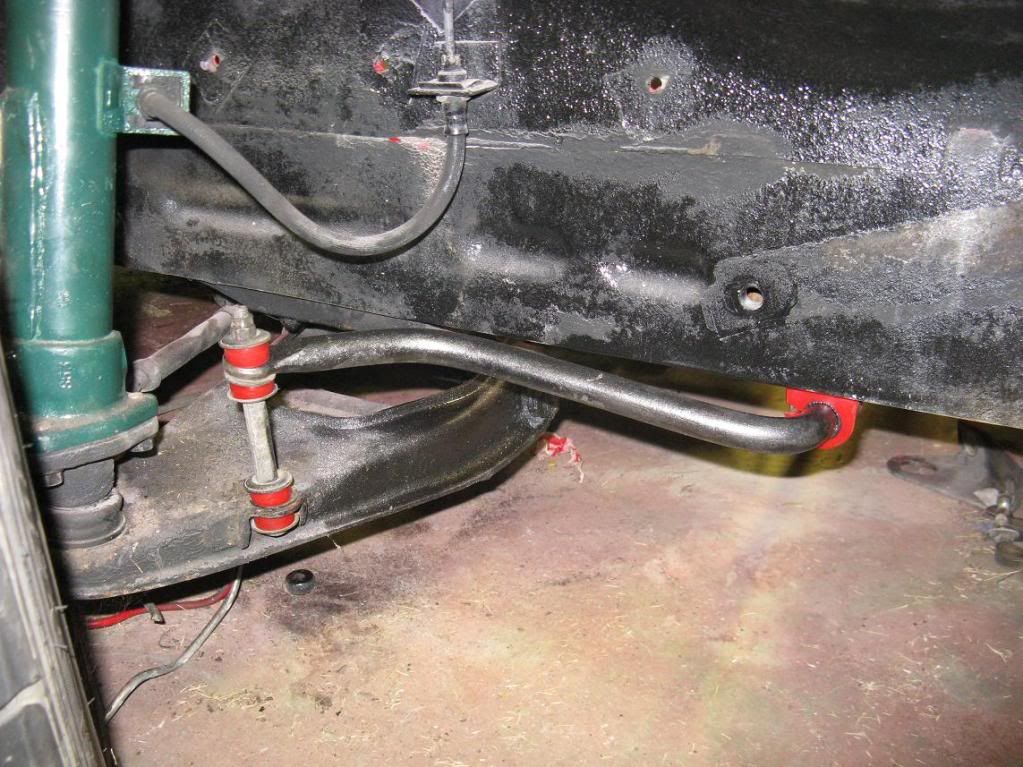
This did give me a chance to work on the fuel system and make it a bit more pressure friendly
So this is the new line, I just unpicked the old return line and used the original clips to fix the new one in place
Starting from the rear I used the hardline fittings to convert it to hose.
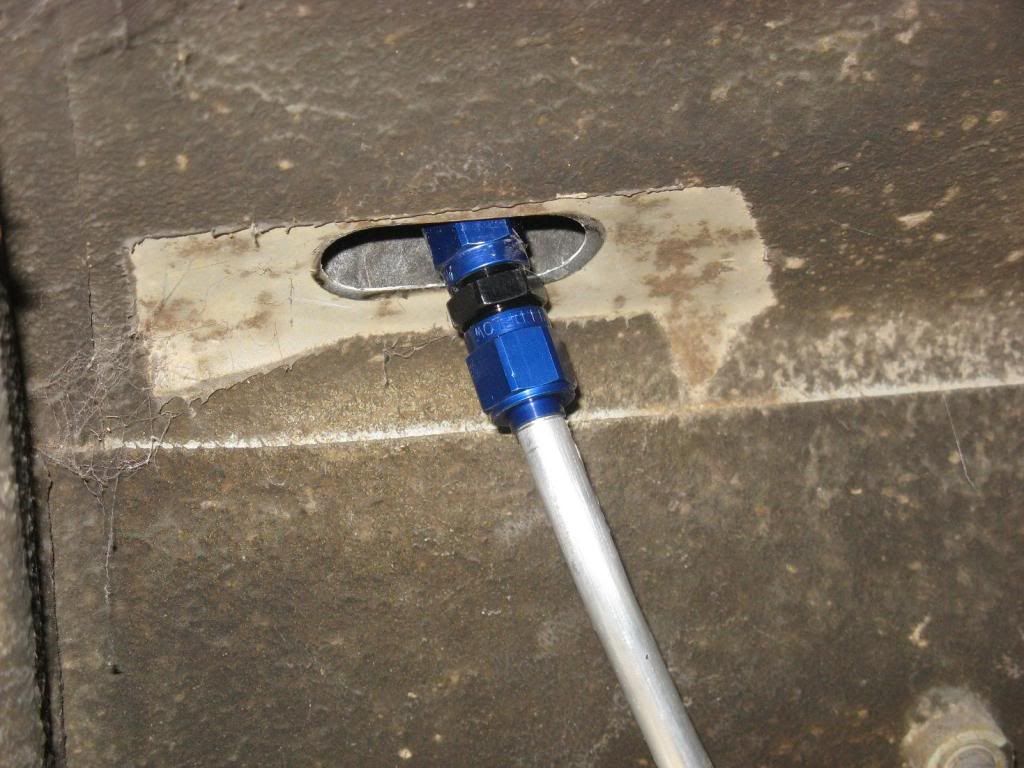
In the boot using the factory fuel hole
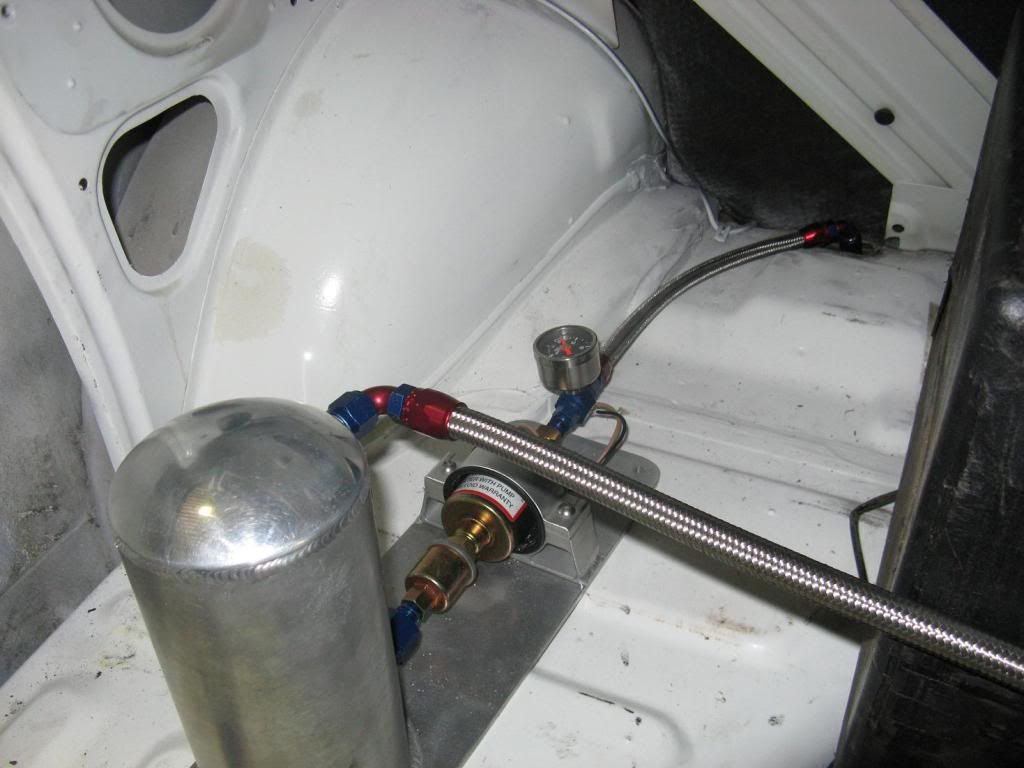
This is how it will look once the new floor is fitted. I scored this cool little inline pump. It is much quieter than a facet and runs between 2.5 and 4psi, perfect for side draughts
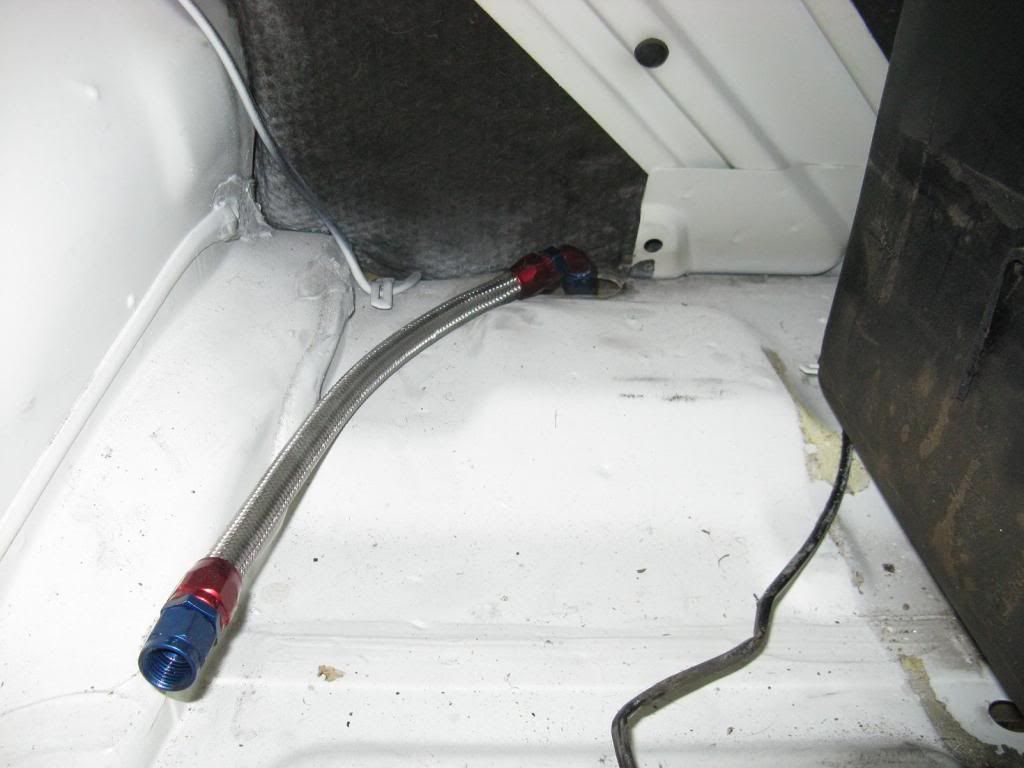
Then up the front I again used the hardline to hose fittings
Once I get the correct fitting for the first carby I will run the hose for that too.
Cheers for the tip geezer. Am I correct in thinking that if I earth the engine to the body and then earth the battery to the body should be all good yeah?
Got more done than I expected this weekend but still a lot to do. I think the momentum will pick up a lot over the next few weeks.
This did give me a chance to work on the fuel system and make it a bit more pressure friendly
So this is the new line, I just unpicked the old return line and used the original clips to fix the new one in place
Starting from the rear I used the hardline fittings to convert it to hose.
In the boot using the factory fuel hole
This is how it will look once the new floor is fitted. I scored this cool little inline pump. It is much quieter than a facet and runs between 2.5 and 4psi, perfect for side draughts
Then up the front I again used the hardline to hose fittings
Once I get the correct fitting for the first carby I will run the hose for that too.
Cheers for the tip geezer. Am I correct in thinking that if I earth the engine to the body and then earth the battery to the body should be all good yeah?
Got more done than I expected this weekend but still a lot to do. I think the momentum will pick up a lot over the next few weeks.
Re: My GC Hardtop project
Yep, that's the way. Make sure the positive wire is secured well and you use grommets wherever the heavy gauge wire passes through metal- if the insulation is breached anywhere the damage could be catastrophic. Install a circuit breaker or a fuse block straight off the battery as a safeguard. If you're using a sealed battery you shouldn't need to have a ventilated battery case.
Re: My GC Hardtop project
I actually found the cheapest place to get the right gauge of wire for the battery was from a specialised battery shop. I think it was about 30 to 40 dollars including fittings for the earth and positive cable. I also put in 2 earth cables to the chassis to two different places just to be sure.
Also I think jaycar car had some solid-state relays with circuit breaker that would suitable for the battery. Keep in mind that the starter motor pulls a huge current, somewhere in the hundreds of amps if I recall correctly.
Also I think jaycar car had some solid-state relays with circuit breaker that would suitable for the battery. Keep in mind that the starter motor pulls a huge current, somewhere in the hundreds of amps if I recall correctly.
'72 GB Galant Sedan nanna spec daily
'85 GN Sigma Wagon 4g63 SOHC Turbo almost ready for the road
'74 GC Galant Coupe long term project
'85 GN Sigma Wagon 4g63 SOHC Turbo almost ready for the road
'74 GC Galant Coupe long term project
-
81GL
- Sigma-Galant Police (Global Mod)
- Posts: 912
- Joined: Mon Mar 23, 2009 7:27 am
- Location: Mildura Sunraysia Vic
Re: My GC Hardtop project
Looking good Jason.
I doubt you will get a reliable method of current limiting the battery for the starter... I mean at 12V its a bit difficult to distinguish 100amp to 300amp. Better off making sure the situation can't arise in the first place. If you paranoid about going through a hole in the chassis that it might cut it, use a grommet like this:
http://3.bp.blogspot.com/_Na_LV8MbvUw/S ... 0657-1.JPG
Available from any electrical wholesaler, and they do come in some pretty large sizes. They have a rubber sleeve inside, and once that nut is done up, the cable is held pretty well!
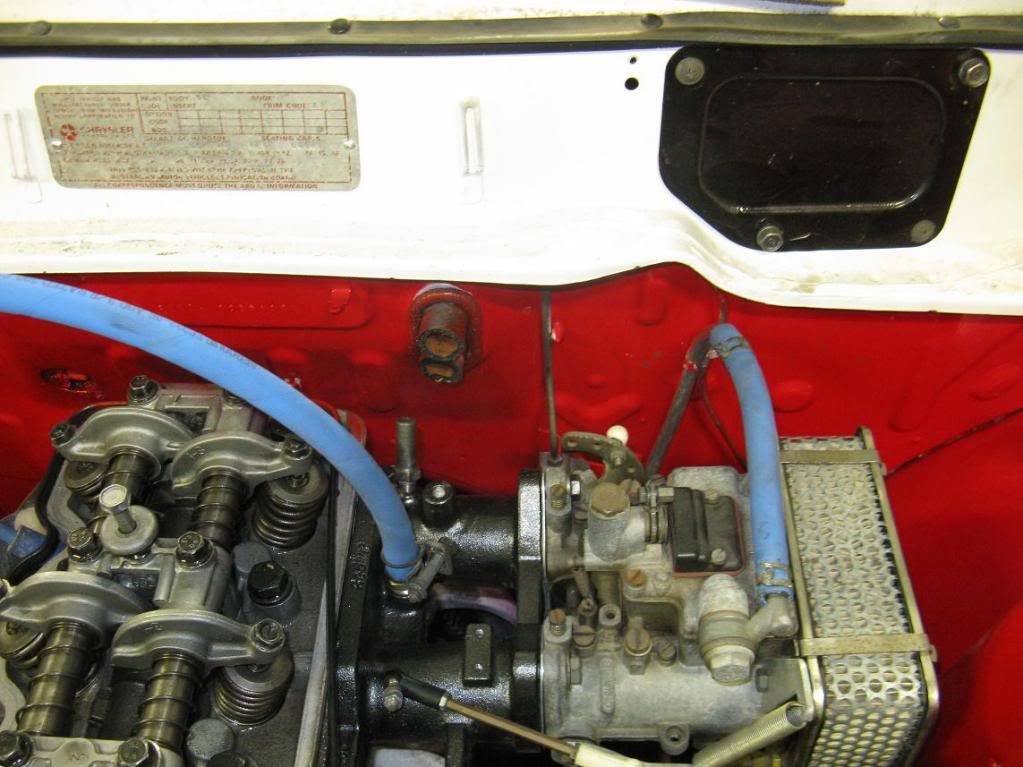
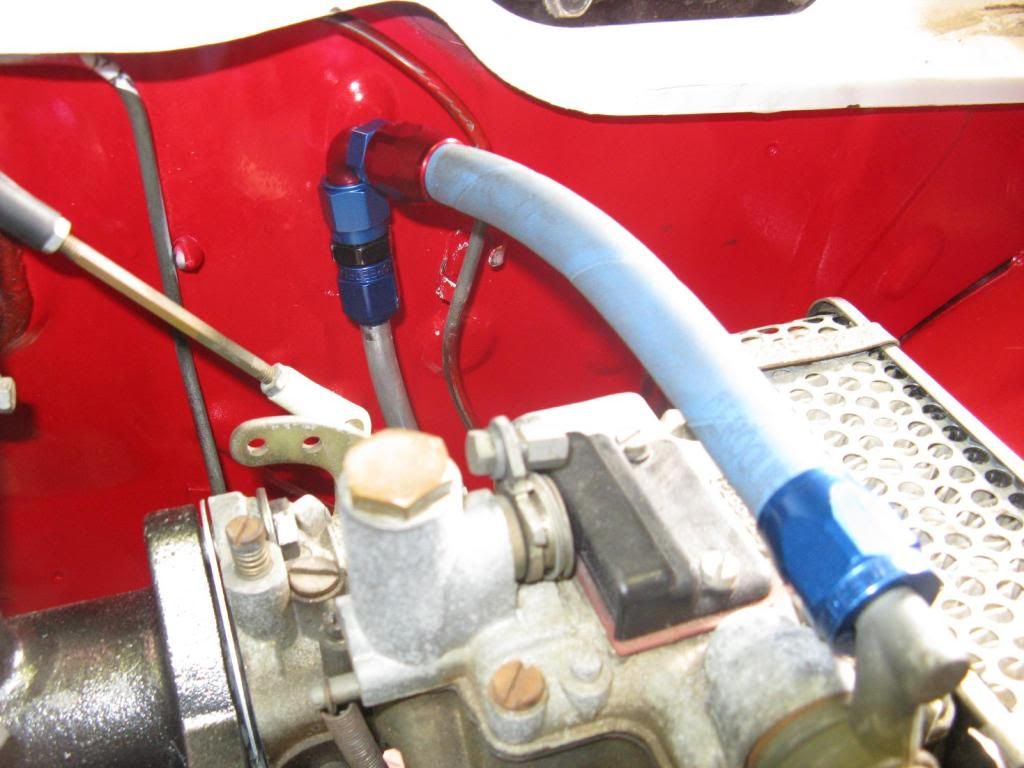
& just to be picky Wheres the one way valve on the brake booster? & the rubber washer for the soft mounts 
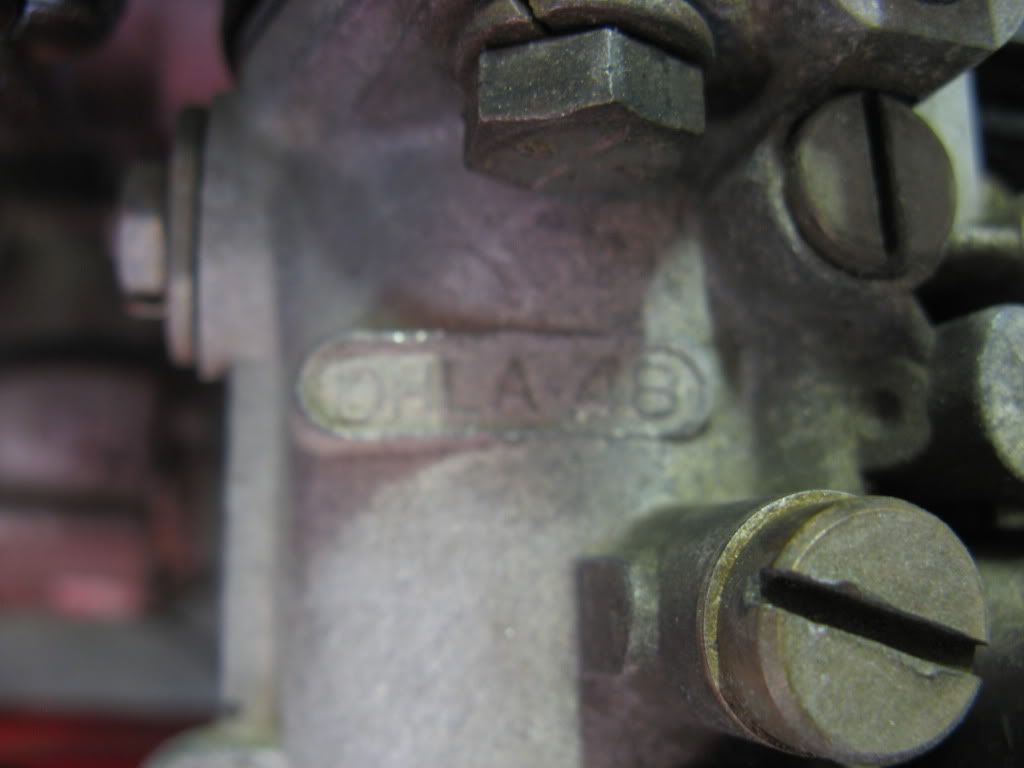
Oh what letter is at the end of the dellorto model number, bit rare to see the idle mix screw above the body rather than recessed? good though, stops them binding the thread if muck gets in there.
Got the same bee's wang of gap too... It's a prick taking the filters off....
I doubt you will get a reliable method of current limiting the battery for the starter... I mean at 12V its a bit difficult to distinguish 100amp to 300amp. Better off making sure the situation can't arise in the first place. If you paranoid about going through a hole in the chassis that it might cut it, use a grommet like this:
http://3.bp.blogspot.com/_Na_LV8MbvUw/S ... 0657-1.JPG
Available from any electrical wholesaler, and they do come in some pretty large sizes. They have a rubber sleeve inside, and once that nut is done up, the cable is held pretty well!
& just to be picky
Oh what letter is at the end of the dellorto model number, bit rare to see the idle mix screw above the body rather than recessed? good though, stops them binding the thread if muck gets in there.
Got the same bee's wang of gap too... It's a prick taking the filters off....
Old school Mitsu's, its not a hobby; it's a life style.
Re: My GC Hardtop project
I noticed that too- did we forget something?81GL wrote: Wheres the one way valve on the brake booster? & the rubber washer for the soft mounts
Re: My GC Hardtop project
Nah not forgotten, it all is coming out again for final paint of the engine and box.
I think I will be inversting in a grommet like that, cheers for the link. I have seen them before used on control panels for gensets and dyno's
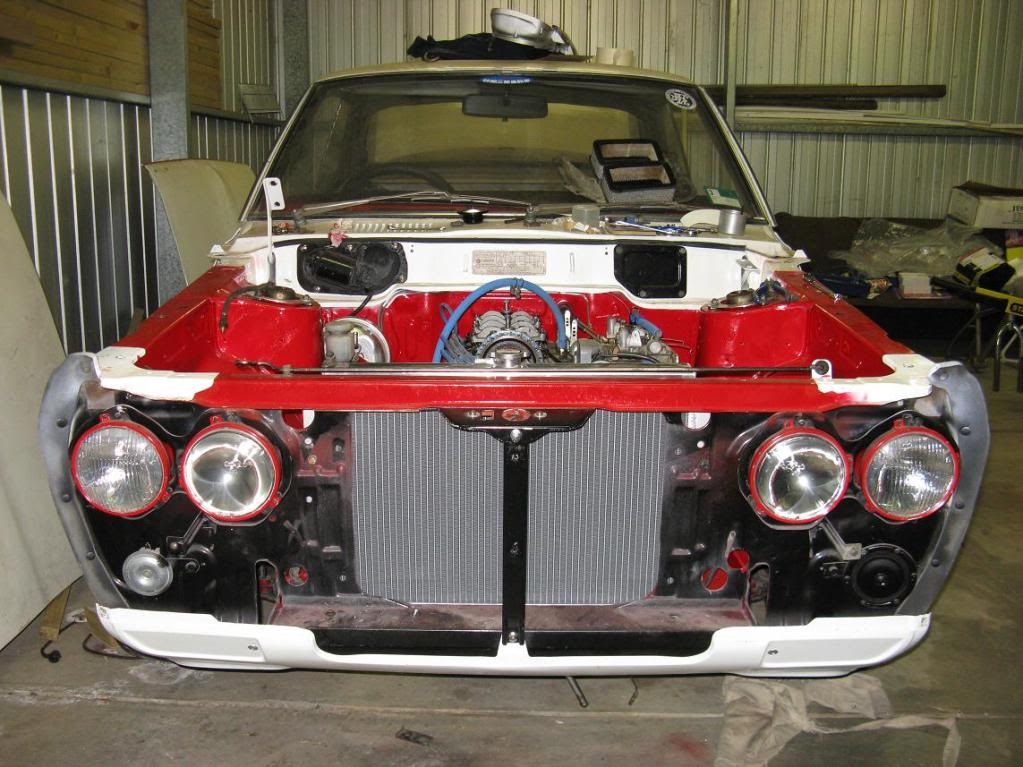
There are no numbers on the carbs, the only print is as follows
On top
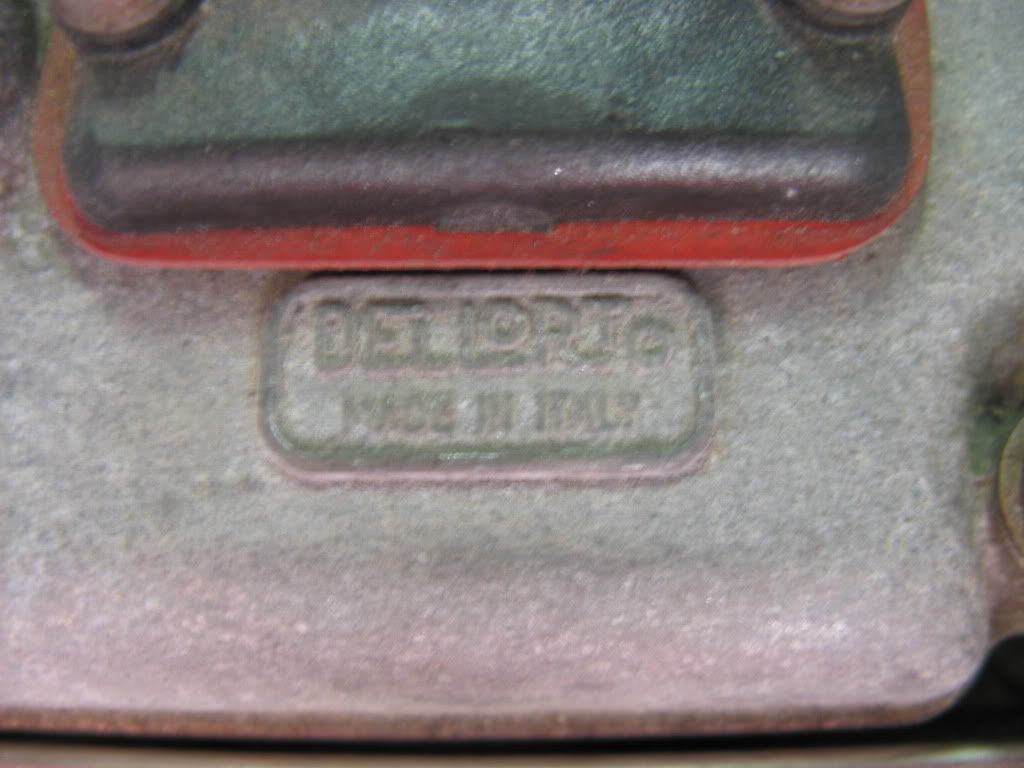
On the leading edge or front side
Trailing edge or rear side
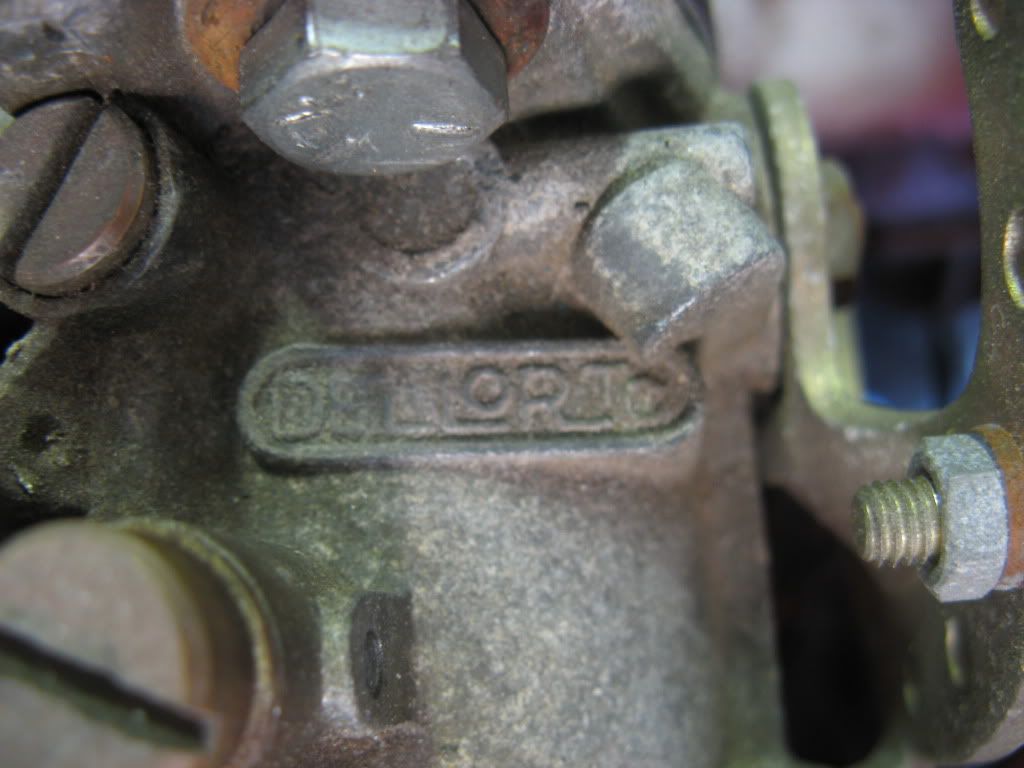
Thats it
I think I will be inversting in a grommet like that, cheers for the link. I have seen them before used on control panels for gensets and dyno's
There are no numbers on the carbs, the only print is as follows
On top
On the leading edge or front side
Trailing edge or rear side
Thats it
-
81GL
- Sigma-Galant Police (Global Mod)
- Posts: 912
- Joined: Mon Mar 23, 2009 7:27 am
- Location: Mildura Sunraysia Vic
Re: My GC Hardtop project
48mm carbs  nice.....
& with no letter after them, would denote them to be a performance carb, aggressive progression curve (can be confirmed by removing the blanking screw)
& with no letter after them, would denote them to be a performance carb, aggressive progression curve
Old school Mitsu's, its not a hobby; it's a life style.
Re: My GC Hardtop project
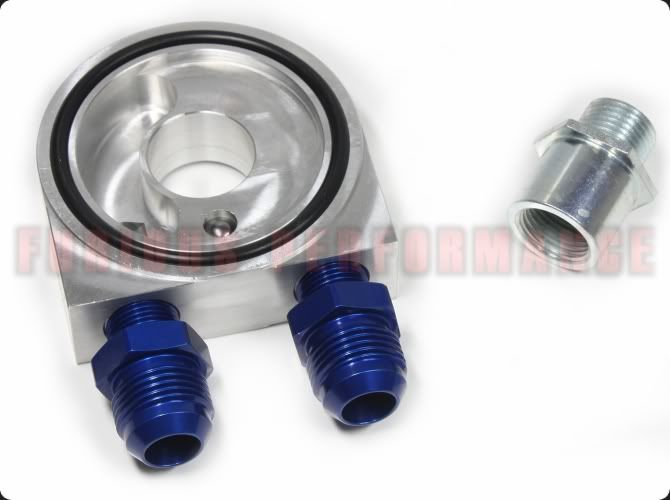
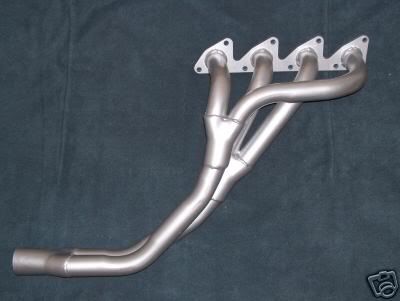
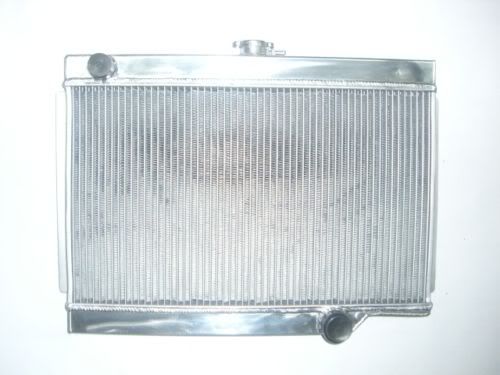
Okay, so I have been on a mad eBay buying spree and am expecting lots of presents next week
Oil filter sandwich plate to suit Astron for oil cooler
Extractors to be reworked to suit Galant
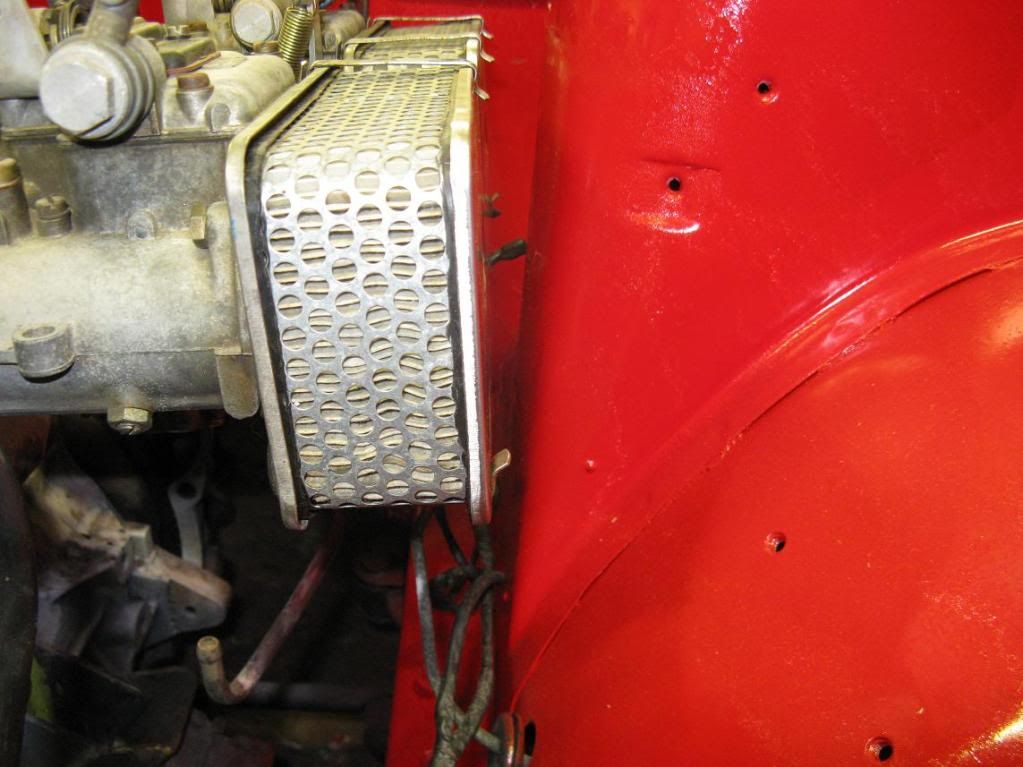
Custom alloy radiator - fingers crossed it fits
Fuel inlet fitting for carbs

Red carpet to line the boot with

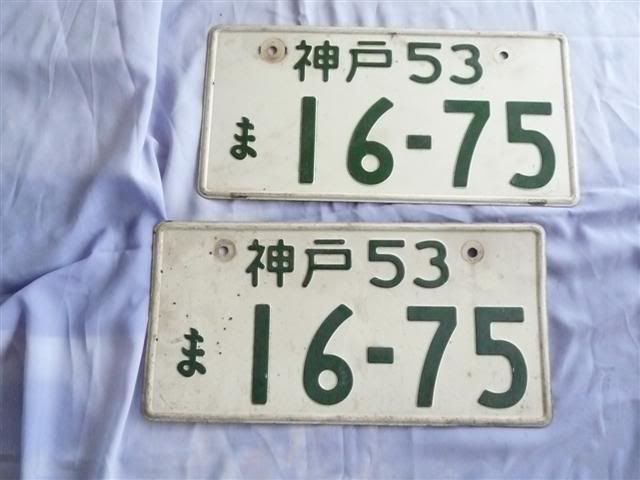
JDM number plates for shows and stuff, my hardtop was built June 1975, so 1/6/75
Plus almost $200 worth of more speedflow fittings to finish off the fuel system
Oil filter sandwich plate to suit Astron for oil cooler
Extractors to be reworked to suit Galant
Custom alloy radiator - fingers crossed it fits
Fuel inlet fitting for carbs
Red carpet to line the boot with
JDM number plates for shows and stuff, my hardtop was built June 1975, so 1/6/75
Plus almost $200 worth of more speedflow fittings to finish off the fuel system
-
orangelancer
- Posts: 636
- Joined: Sun Feb 20, 2011 10:52 am


Re: My GC Hardtop project
Previous owner of a GC Coupe, a few GSRS and random Sigmas.
Converted to the Ultimate Driving Machines
Converted to the Ultimate Driving Machines
-
amgis_obrut
- Posts: 1742
- Joined: Wed Mar 18, 2009 6:26 pm
- Location: Orient Point NSW
Re: My GC Hardtop project
A112H wrote:Okay, so I have been on a mad eBay buying spree and am expecting lots of presents next week
Oil filter sandwich plate to suit Astron for oil cooler
dont use that thing
get one with a thermostat
Jase just use 0 gauge from jaycar and run it through a grommet, it will never rub through
GH Sigma, 16" Mesh wheels, sports steering wheel and a V8 exhaust
Re: My GC Hardtop project
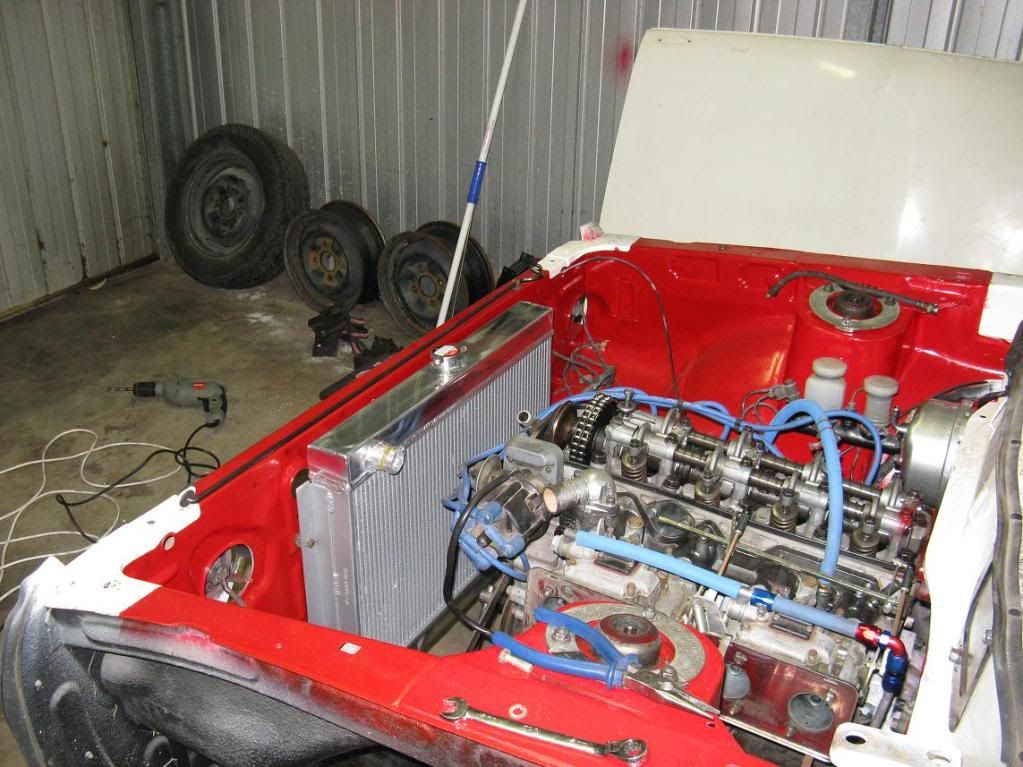
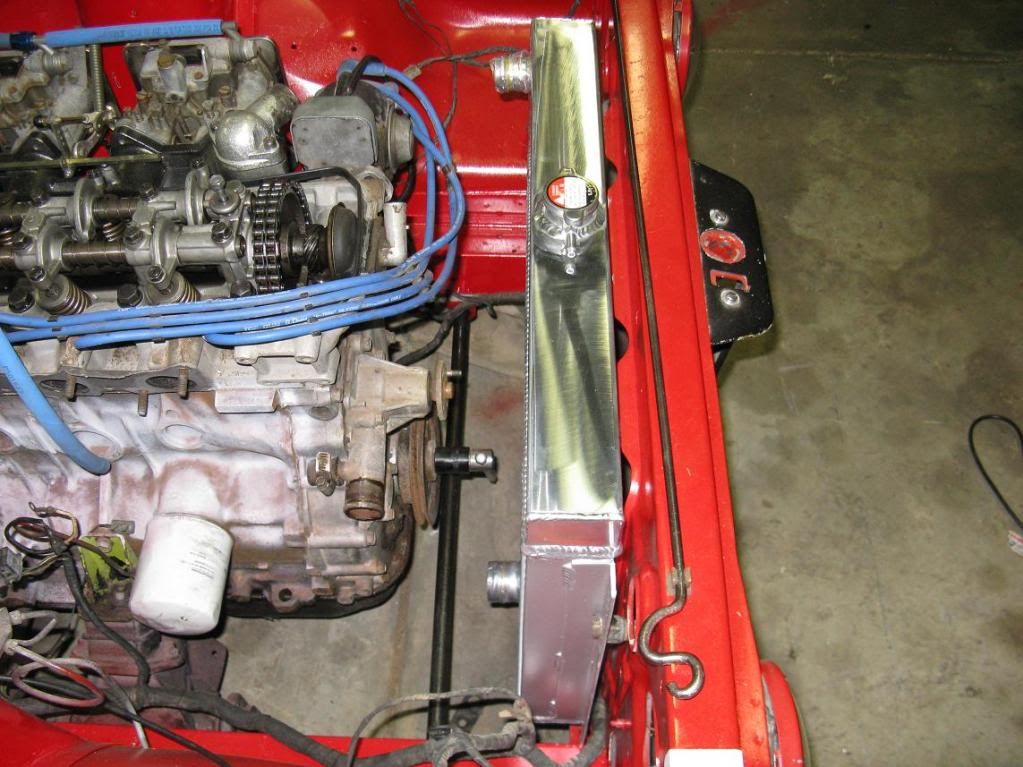
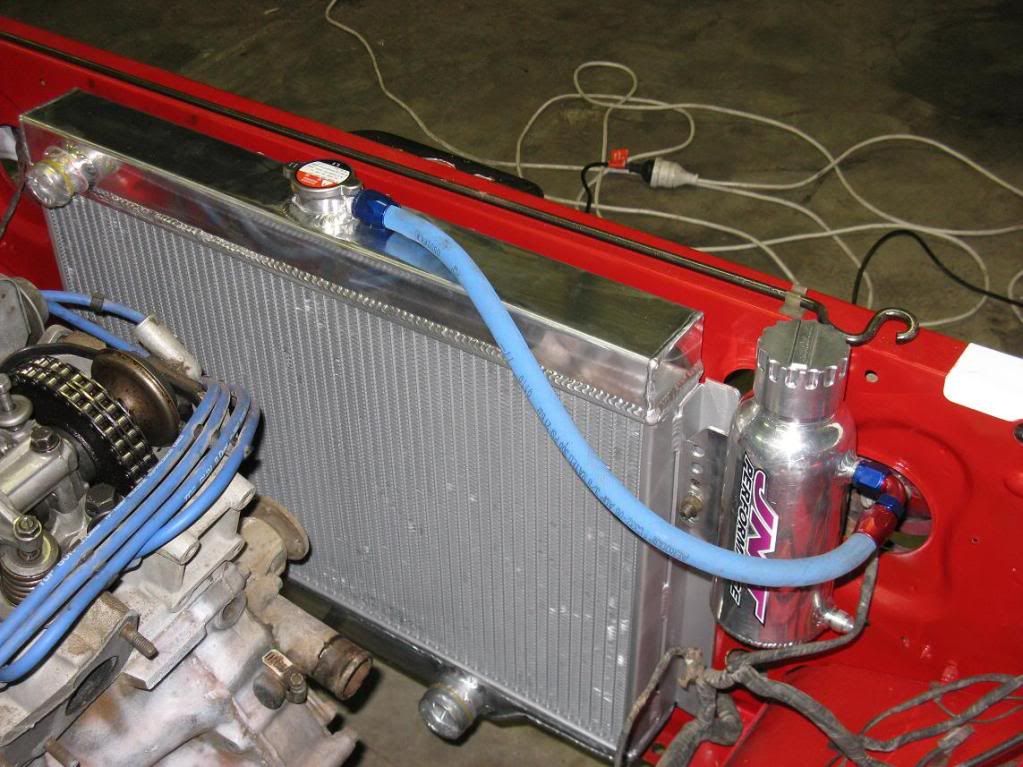
Got my radiator, boot carpet and dual fuel line adaptor thingo today
I like coming home to presents. The rad fits perfectly
I like coming home to presents. The rad fits perfectly
Re: My GC Hardtop project
pics pics pics!
Re: My GC Hardtop project
coming along nicely! i envy the joy your first drive will bring you.....wish my engine bay was as clean as yours is going to be
vrooooom vrooooom!!
Re: My GC Hardtop project
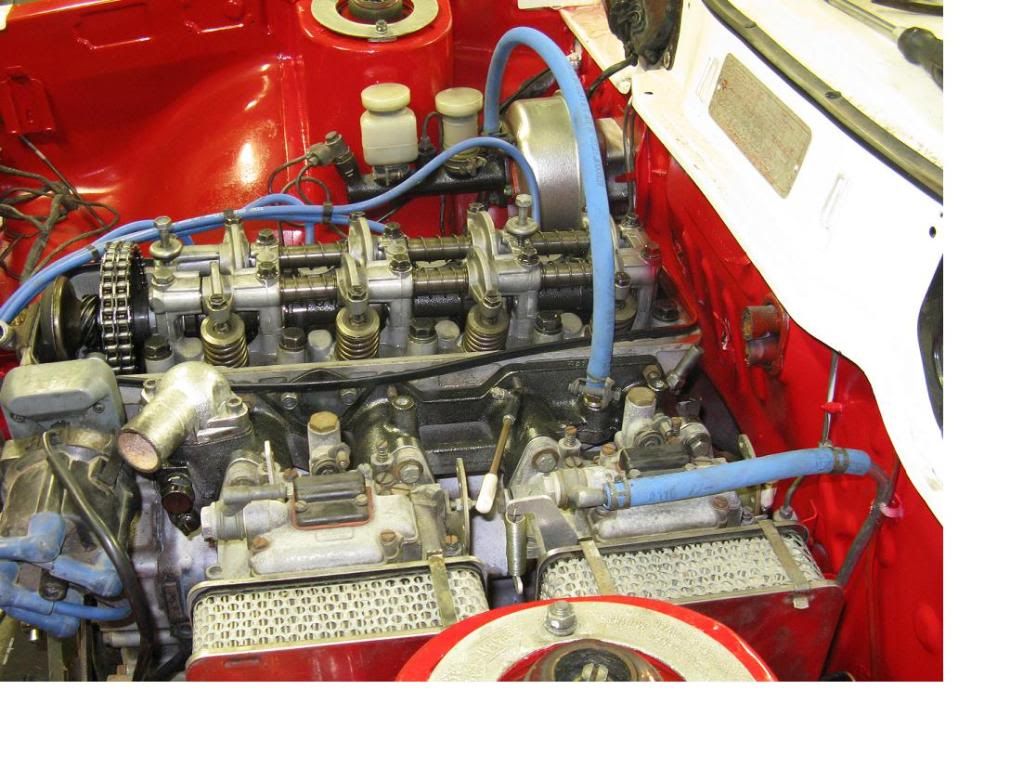
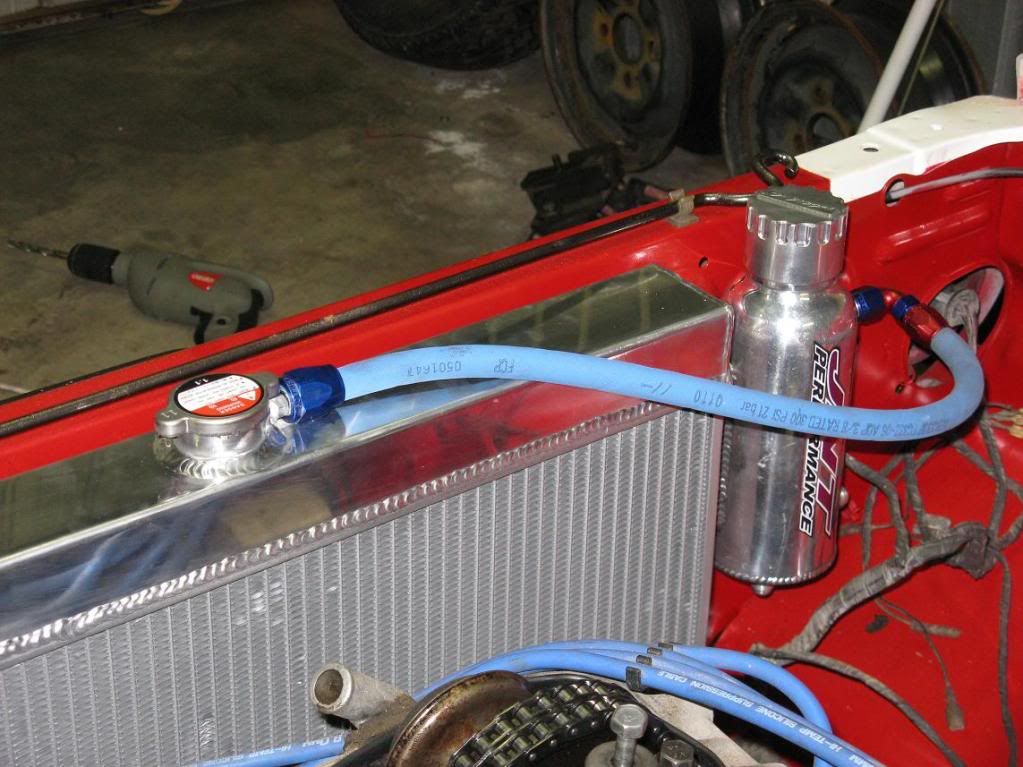
Rad and overflow bottle fit up, you can also see I now have both hoses on the carbs just need the speedflow finishing covers to turn up tomorrow.
Re: My GC Hardtop project
For those that might be interested in the rad, this is it
http://www.ebay.com.au/itm/260767373395
It comes with the cap and the mounts on the side but with no holes, it is a perfect fit for the GC/D Galants.
http://www.ebay.com.au/itm/260767373395
It comes with the cap and the mounts on the side but with no holes, it is a perfect fit for the GC/D Galants.