84GKSIG Build EFI plus more
Re: 84GKSIG slow build - EFI
this build is coming along amazingly well mate. best of luck with everything and i hope its all working out how you intended
Re: 84GKSIG slow build - EFI
cheers matethis build is coming along amazingly well mate. best of luck with everything and i hope its all working out how you intended
since I'm waiting on the intake manifold to come back I thought I would start sorting out some more electrical components in the engine bay.
went and got a thermal fan today which seamed pretty cool... until... crappy little plastic bracket broke didn't it.
don't have any pics of the broken ones cause I threw em some where, after just buying something the last thing you wanna hear is "crack" especially from a bracket that's meant to hold this thing in your engine bay.

so after a couple of minutes of brain storming ideas on how to mount this thing I came up with this idea, wasn't even gonna play with the idea of repairing a plastic one once I seen it break so easily.

close up of where that bracket was meant to slide in

I wasn't happy but also great full at the same time that the bracket didn't break later on while the car was driving.
Any how, I think my brackets will work a lot better and even better still when I get tension washers or lock nuts to stop anything coming apart with vibrations.
The finished product

Installed, all happy, and mounted off center of the radiator

Clearance between the fan and water pump, just enough space to squeeze belts through without the need of dismantling anything

M.B

Re: 84GKSIG slow build - EFI
So far so good.
Happy to see that things are going pretty smoothly.
thermo is looking the goods, oh also with your loom did you cut your plugs off and rejoin after the loom was through the firewall?

Happy to see that things are going pretty smoothly.
thermo is looking the goods, oh also with your loom did you cut your plugs off and rejoin after the loom was through the firewall?
TVMDouble0h!Sixx
1985 GK GSR

1985 GK GSR
Re: 84GKSIG slow build - EFI
cheers mateSo far so good.
Happy to see that things are going pretty smoothly.
thermo is looking the goods, oh also with your loom did you cut your plugs off and rejoin after the loom was through the firewall?
With the plugs I left them intact no cutting at all, I just went though the hole saw set and just went with a hole saw that the biggest plug would fit through, for the tr magna that happens to be 50- 51 mm, then just pushed the biggest plug through first then followed by the rest

inside view of the hole in the firewall. Comes out right behind the blower box for the aircon set up
M.B
Last edited by 84GKSIG on Mon Nov 15, 2010 1:18 am, edited 1 time in total.
Re: 84GKSIG slow build - EFI
ahh i see. yeh im hoping to also fit plugs through the hole.
Lovin these pictures they're great!
Lovin these pictures they're great!
TVMDouble0h!Sixx
1985 GK GSR
1985 GK GSR
Re: 84GKSIG slow build - EFI
I ran my wiring through the rubber grommet to the left. I had to extend the TR/TS loom to reach that far though.84GKSIG wrote:
inside view of the hole in the firewall. Comes out right behind the blower box for the aircon set up


Re: 84GKSIG slow build - EFI
I think these cars are brilliant cause there the perfect example when it comes to doing something in more than one way ") and the space under the bonnet is enough for anything with a decent amount of power ... if only I had the $$$$$$$
and the space under the bonnet is enough for anything with a decent amount of power ... if only I had the $$$$$$$ 
M.B
M.B

Re: 84GKSIG slow build - EFI
hey man just woundering if u stayed 2l or went 2.6 when u changed the engine
looks like its going along good there to man
cheers dave
looks like its going along good there to man
cheers dave
Current Cars
-GJ Scorpo Turbo (Current Project)
-VQ SV90 #098 (Finished)
-74 RX3 12A Coupe (13B Extend Port)
-HR31 Passage GT (New daily) 4 Sale inbox for details
Some Old cars
-RX8
-VQ (Slammed on 19's)
-GL Scorpo (Immac std 58000ks)
-GK Scorpo N/A H/C (RIP 146.8rwhp)
-GJ Scorpo Turbo (Current Project)
-VQ SV90 #098 (Finished)
-74 RX3 12A Coupe (13B Extend Port)
-HR31 Passage GT (New daily) 4 Sale inbox for details
Some Old cars
-RX8
-VQ (Slammed on 19's)
-GL Scorpo (Immac std 58000ks)
-GK Scorpo N/A H/C (RIP 146.8rwhp)
Re: 84GKSIG slow build - EFI
cheers daveby HEMI26 » Wed Dec 01, 2010 6:12 pm
hey man just woundering if u stayed 2l or went 2.6 when u changed the engine
looks like its going along good there to man
cheers dave
when I changed engines, I changed to the astron 2 2.6L (from any GN model sigma or 85 model GSR) reason being the 2L block is narrow and narrow 5 speed boxes were too hard for me to get a hold of, ended up getting a hold of a wide block 5 speed and originally I wanted to get the wide block holes drilled into a magna block I had but never really got any good answers from any one as to where it could be done and how much $$$
still have plans in the back of my head to convert a 2L engine to efi delete balance shafts and possibly turbo or super charge it. both have their advantages and disadvantages.
M.B
Re: 84GKSIG slow build - EFI
i thought so man, and didnt think that jap 5spds were hard to get and would be good to see a efi 2l
Current Cars
-GJ Scorpo Turbo (Current Project)
-VQ SV90 #098 (Finished)
-74 RX3 12A Coupe (13B Extend Port)
-HR31 Passage GT (New daily) 4 Sale inbox for details
Some Old cars
-RX8
-VQ (Slammed on 19's)
-GL Scorpo (Immac std 58000ks)
-GK Scorpo N/A H/C (RIP 146.8rwhp)
-GJ Scorpo Turbo (Current Project)
-VQ SV90 #098 (Finished)
-74 RX3 12A Coupe (13B Extend Port)
-HR31 Passage GT (New daily) 4 Sale inbox for details
Some Old cars
-RX8
-VQ (Slammed on 19's)
-GL Scorpo (Immac std 58000ks)
-GK Scorpo N/A H/C (RIP 146.8rwhp)
Re: 84GKSIG slow build - EFI
wide pattern jap 5 speeds are easy to find, narrow pattern to suit the 2 liter engine and narrow auto and magna blocks are hard to come by and when you do there not usually cheep.. from my experience any way, others may differ from mineby HEMI26 » Thu Dec 02, 2010 11:58 am
i thought so man, and didnt think that jap 5spds were hard to get and would be good to see a efi 2l
M.B
Re: 84GKSIG slow build - EFI
been a while since an update so here we go..
had been waiting a while now for the bottom half of the manifold to be modified and have the thermostat moved up to the front, the guy who was doing it for me was booked out so took him a while to get round to it, any how here it is.


old thermostat housing on the back

gasket glue and a gasket with a blanking plate made up to block it off to make sure it wont leak
manifold all fitted and testing fitting the fuel rail and everything fits perf.... wait whats this.. fuel pressure regulator wont clear the thermostat housing... F@%^

well... not the right way up any way.. flipping it upside down and modding the flange it fits but I've decided this will be only a temporary solution to the problem. eventually will go with an adjustable fuel pressure regulator mounted remotely but until that time comes this will do for a cheep easy fix. lost so much sleep over it i have to admit.

hoses and wiring now going back in, in this pic you can see how the housing should of been further to the left and further upwards but oh well

cant even see the fuel pressure regulator unless you really look for it

looking more like an engine again and not a pile of random parts

M.B p.s for those wondering. I got bored and frustrated while trying to think of a solution so i drew the pic that's now sitting in my signature space hopefully mine will look that good some time next year.
had been waiting a while now for the bottom half of the manifold to be modified and have the thermostat moved up to the front, the guy who was doing it for me was booked out so took him a while to get round to it, any how here it is.
old thermostat housing on the back
gasket glue and a gasket with a blanking plate made up to block it off to make sure it wont leak
manifold all fitted and testing fitting the fuel rail and everything fits perf.... wait whats this.. fuel pressure regulator wont clear the thermostat housing... F@%^
well... not the right way up any way.. flipping it upside down and modding the flange it fits but I've decided this will be only a temporary solution to the problem. eventually will go with an adjustable fuel pressure regulator mounted remotely but until that time comes this will do for a cheep easy fix. lost so much sleep over it i have to admit.
hoses and wiring now going back in, in this pic you can see how the housing should of been further to the left and further upwards but oh well
cant even see the fuel pressure regulator unless you really look for it
looking more like an engine again and not a pile of random parts
M.B
Re: 84GKSIG slow build - EFI
I like your new Signature!
Build is looking and sounding well!
Sucks about your inlet debacle
Build is looking and sounding well!
Sucks about your inlet debacle
TVMDouble0h!Sixx
1985 GK GSR
1985 GK GSR

Re: 84GKSIG slow build - EFI
hahaha i like the sig, do me one in red 
Previous owner of a GC Coupe, a few GSRS and random Sigmas.
Converted to the Ultimate Driving Machines
Converted to the Ultimate Driving Machines
Re: 84GKSIG slow build - EFI
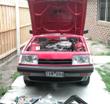
So today I managed to clear out the shed start the car and take it outside, was quite surprised the neighbor didn't complain .. that or maybe I just didn't hear him over the exhaust .. or lack of exhaust I should say. 
Gave the engine bay a quick degrease and a nice hosing off, played around with an old heat shield off a tr magna and modified it slightly (still needs some more modding) maybe actually attach a small frame to the pacemakers and leave it on there, I think it kinda moderns up the engine bay a little further and keeps things looking neat which is what I set my goal to be.
some pics, not many but enough


do you like my temporary break booster vacuum hose?
still sorting out some wires! not many left to go now
M.B
Gave the engine bay a quick degrease and a nice hosing off, played around with an old heat shield off a tr magna and modified it slightly (still needs some more modding) maybe actually attach a small frame to the pacemakers and leave it on there, I think it kinda moderns up the engine bay a little further and keeps things looking neat which is what I set my goal to be.
some pics, not many but enough
do you like my temporary break booster vacuum hose?
still sorting out some wires! not many left to go now
M.B
Re: 84GKSIG slow build - EFI
hey man im liking that heat sheild looks good good idea
looks like it's hiding somthing under there to
looks like it's hiding somthing under there to
Current Cars
-GJ Scorpo Turbo (Current Project)
-VQ SV90 #098 (Finished)
-74 RX3 12A Coupe (13B Extend Port)
-HR31 Passage GT (New daily) 4 Sale inbox for details
Some Old cars
-RX8
-VQ (Slammed on 19's)
-GL Scorpo (Immac std 58000ks)
-GK Scorpo N/A H/C (RIP 146.8rwhp)
-GJ Scorpo Turbo (Current Project)
-VQ SV90 #098 (Finished)
-74 RX3 12A Coupe (13B Extend Port)
-HR31 Passage GT (New daily) 4 Sale inbox for details
Some Old cars
-RX8
-VQ (Slammed on 19's)
-GL Scorpo (Immac std 58000ks)
-GK Scorpo N/A H/C (RIP 146.8rwhp)
Re: 84GKSIG slow build - EFI
Cheers for the comments guys
heres one for any one wondering

bolted the bonnet on, everything fits nothing fouls on anything, I couldn't possibly be any happier with it! bedsides the fact that its reaaaaaaaallly dirty, its gonna be striped to bare metal any way so why relay bother cleaning it?
once wiring is done and alarm is installed and other wiring is revised (mostly sound system and central locking gear) then time for body work .. finally 
M.B
heres one for any one wondering
bolted the bonnet on, everything fits nothing fouls on anything, I couldn't possibly be any happier with it! bedsides the fact that its reaaaaaaaallly dirty, its gonna be striped to bare metal any way so why relay bother cleaning it?
once wiring is done and alarm is installed and other wiring is revised (mostly sound system and central locking gear) then time for body work
M.B
Re: 84GKSIG slow build - EFI
alright so made up a temporary exhaust, even threw in the magna cat converter (just made up roughly out of tr magna exhaust) this will allow me to play around a bit without annoying neighbors too much.
still organizing some wiring,
Quick vid here of it starting up and running for longer than 3 seconds
http://s541.photobucket.com/albums/gg38 ... unning.mp4
everything seems to run real nice, after about a min of running ecu throws back o2 sensor error. (fair enough not yet installed it but will happen when the exhaust is properly done)
any one got suggestions for good exhaust places in Adelaide? and not to painful on the wallet?
M.B
Re: 84GKSIG slow build - EFI
That seems to be running really nice and smoothly, great job mate
An old mate of mine Mark, owns Exhaust Technology on Goodwood Rd 8272 7500. He isn't cheap but everyone is very happy with the price when they see the quality of work.
An old mate of mine Mark, owns Exhaust Technology on Goodwood Rd 8272 7500. He isn't cheap but everyone is very happy with the price when they see the quality of work.
Re: 84GKSIG slow build - EFI
AAA Exhaust, Deacon Ave, Richmond.
2* 73 A53 16L Dodge Colt (Plymouth Cricket), 2* 73 GB Galant Sedan's, 1* 74 GB Galant Sedan, 1* 76 VK Valiant Regal,
1* 79 GE SE Sigma Sedan, 1* 81 GH Sigma PWS, 1* 84 GK Sigma SE, 1* 85 GK Sigma GL - Replacing the 84 GK SE, 1* 91 GTO - FOR SALE

1* 79 GE SE Sigma Sedan, 1* 81 GH Sigma PWS, 1* 84 GK Sigma SE, 1* 85 GK Sigma GL - Replacing the 84 GK SE, 1* 91 GTO - FOR SALE
Re: 84GKSIG slow build - EFI
Galant_GT0 wrote:That seems to be running really nice and smoothly, great job mate
An old mate of mine Mark, owns Exhaust Technology on Goodwood Rd 8272 7500. He isn't cheap but everyone is very happy with the price when they see the quality of work.
Cheers guysGB_BB4C wrote:AAA Exhaust, Deacon Ave, Richmond.
Re: 84GKSIG slow build - EFI
And a little bit of an over due update, since last time the interior was finally sorted out, the old cracked dash came out (had to come out any way to install the ac set up)
new dash was painted up

my valuer trimmed dash pad got a quick squirt of paint as well

dash finally back in with the ecu hanging there in all its glory

center console and head unit back in, ecu was mounted, as well as new RCA cables put in and new speaker wires fed through for the stereo, can finally play with the electric windows again now.

got this a while back and began installing it

everything looks good when its still in the box

ahh like I said it looked better in the box

I went through the whole engine bay and just went crazy with split tubing. Looks a lot neater now im really happy with it.

sorted out my break booster vacuum hose too. now im defiantly happier with it.

only 3 more things in the engine bay to sort out, oxygen sensor (which is gonna be done when the exhaust is) and thermal fan switch (which I am still undecided on) and the speedo cable

also fixed up my horn button which im probably not gonna use if all goes well with my GSR steering wheel

After having reinstalled the stereo I realized that the 2 way JVCs sounded better without the dash mat and this was cause the dash pad wasn't blocking out the highs from the tweeter so I went and bought tweeters without first thinking of a spot to put them. After playing around with different positions I decided that the best spot would be here...

for a couple of reasons.
1. I'm not drilling holes or mounting it to the dash
2. I'm not mounting it in the side window demister vents cause I like to have working demisters, chances are you never use them but that one time you want them to work you'll suffer,.
3. If I ever change my mind about the location that little panel can be replaced with another and you would never know they were before, and for those wondering nope it doesn't interfere with the mirror adjustment leaver thingo.

sounds way nicer now could sit in there for hours just listening to music if it wasn't so hot.
so heres my update for now I guess
M.B
new dash was painted up
my valuer trimmed dash pad got a quick squirt of paint as well
dash finally back in with the ecu hanging there in all its glory
center console and head unit back in, ecu was mounted, as well as new RCA cables put in and new speaker wires fed through for the stereo, can finally play with the electric windows again now.
got this a while back and began installing it
everything looks good when its still in the box
ahh like I said it looked better in the box
I went through the whole engine bay and just went crazy with split tubing. Looks a lot neater now im really happy with it.
sorted out my break booster vacuum hose too. now im defiantly happier with it.
only 3 more things in the engine bay to sort out, oxygen sensor (which is gonna be done when the exhaust is) and thermal fan switch (which I am still undecided on) and the speedo cable
also fixed up my horn button which im probably not gonna use if all goes well with my GSR steering wheel
After having reinstalled the stereo I realized that the 2 way JVCs sounded better without the dash mat and this was cause the dash pad wasn't blocking out the highs from the tweeter so I went and bought tweeters without first thinking of a spot to put them. After playing around with different positions I decided that the best spot would be here...
for a couple of reasons.
1. I'm not drilling holes or mounting it to the dash
2. I'm not mounting it in the side window demister vents cause I like to have working demisters, chances are you never use them but that one time you want them to work you'll suffer,.
3. If I ever change my mind about the location that little panel can be replaced with another and you would never know they were before, and for those wondering nope it doesn't interfere with the mirror adjustment leaver thingo.
sounds way nicer now could sit in there for hours just listening to music if it wasn't so hot.
so heres my update for now I guess
M.B
Re: 84GKSIG Build EFI plus more
As every one knows the last couple of days have been hot and the last thing you wanna do is work or be outside and worst of them all work outside. Therefore no work on the car for the last couple of days, Well not on the car its self but maybe some car parts?
The good old cluster comes in handy, it lets you know many things like rpm and speed and some times when it chooses it even tells you you have a full tank of fuel when you don't.
any how let me say that I don't mind the sigma dash found in the GKs with the green (illumination if you have one you know what im talking about) I don't mind the amber from the earlier GJ either. Years ago I was thinking about a digital dash conversion as some of you have seen or even have, I, don't mind the digital dash either but I do prefer the old school round gauge look so here we go.
After ripping a spare dash to pieces and at first doing some scans and playing around I decided that I was gonna give the typical white face replacements a miss..
White tachometer

maybe its the needle but I don't know I don't like the look of it?
after looking at a couple of dashboards on google I thought about it and threw together a little design of my own and added a couple of extra bits and pieces.
so here was a quick prototype just holding the cluster surround against the screen.

then I changed the circle in the middle a little.. to me.. I thought. Perfect

after a little more work I made up the rest

while here I figured hey why not and made up some red ones

So here's the cluster with paper mock ups ( anyone know where the needles are from? )

so after doing some research and running around and using some brain power I was able to piece together this

(note the gauge on the left is made of paper)
I of course then went crazy with power and continued to make the rest to see what it would look like with this ache to see this thing illuminated.

so if you read till now then this is the bit your probably waiting to see the most .. as was I ..

closer view

and here also one of the guage face to the left and right still made out of paper just to see the difference. As you can see. not so flash

when I have some time ill print out some red ones just to see what it looks like.
This is only prototyping for now as I have plans to modify the gauge faces further.
Edit: forgot to mention that I'm using the standard wattage globes. no ultra bright or LEDs or those globes which are meant to be ultra white
M.B
The good old cluster comes in handy, it lets you know many things like rpm and speed and some times when it chooses it even tells you you have a full tank of fuel when you don't.
any how let me say that I don't mind the sigma dash found in the GKs with the green (illumination if you have one you know what im talking about) I don't mind the amber from the earlier GJ either. Years ago I was thinking about a digital dash conversion as some of you have seen or even have, I, don't mind the digital dash either but I do prefer the old school round gauge look so here we go.
After ripping a spare dash to pieces and at first doing some scans and playing around I decided that I was gonna give the typical white face replacements a miss..
White tachometer
maybe its the needle but I don't know I don't like the look of it?
after looking at a couple of dashboards on google
so here was a quick prototype just holding the cluster surround against the screen.
then I changed the circle in the middle a little.. to me.. I thought. Perfect
after a little more work I made up the rest
while here I figured hey why not and made up some red ones
So here's the cluster with paper mock ups ( anyone know where the needles are from? )
so after doing some research and running around and using some brain power I was able to piece together this
(note the gauge on the left is made of paper)
I of course then went crazy with power and continued to make the rest to see what it would look like with this ache to see this thing illuminated.
so if you read till now then this is the bit your probably waiting to see the most .. as was I ..
closer view
and here also one of the guage face to the left and right still made out of paper just to see the difference. As you can see. not so flash
when I have some time ill print out some red ones just to see what it looks like.
This is only prototyping for now as I have plans to modify the gauge faces further.
Edit: forgot to mention that I'm using the standard wattage globes. no ultra bright or LEDs or those globes which are meant to be ultra white
M.B
Last edited by 84GKSIG on Wed Feb 02, 2011 7:34 pm, edited 1 time in total.

Re: 84GKSIG Build EFI plus more
hey buds,the cars coming along great..i love the cluster,i want a red one??awsome idea.

1984 SIGMA GK GSR (was EFI TURBO 10psi 194.0kw atw ) N/A head & cam

*1991 VN SS 5spd...HI COMP HEAD & CAM

2004 MITSUBISHI EXPRESS BIG RIG MOBILE DETAILING 0414017857!

MY NEW TOY F6310
Re: 84GKSIG Build EFI plus more
Hey cheers mateISKA8 wrote:hey buds,the cars coming along great..i love the cluster,i want a red one??awsome idea.

a quick test prior to installing was a good idea. only 2 of the globes in the dash were working lol

ISKA8 if you really like the red one send us a pm
M.B
Re: 84GKSIG Build EFI plus more
Well as usual its been a while since the last post so thought id post a small update, nothing yet done with paint (still conducting researches if any one has any information at all that's any better than whats been dribbled on in other forums on the net please let me know or point me in the right direction. one thing I'm struggling to find information on.. ISO free 2k paint in particular etch prime and high fill primer)
So pretty much all wiring in the engine bay is complete and am in the process of making brackets for the windscreen washer bottle and radiator overflow bottle.
Had one more wire left to connect which was the one from the thermal fan relay.. now its finally connected and thermal fan kicks in beautifully when its needed. pics
Of course I knew I was gonna use a thermal switch to turn the fan on and off and had been thinking of ways to mount it and where to mount it and as I was thinking of ideas I had the engine bay of my magna open when I saw this

that wonderful piece of pipe joining the top radiator hose.

hmm turns out this sucker is actually stainless steel, what the hell right? well any way it wasnt what i was expecting

found a bolt that would thread strait onto the thermal switch and cut it in half ending up with a real nice clean side, bolt as far as I know is regular steel.

clean side of the bolt
so after preparing the surface of the pipe by hammering a section flat sanding some paint off pre drilling and cleaning up my bolt I fired up the oxy and heavily tinned both faces of the metals that are going to be welded together, then placed the bolt on top and heated them both together till the filler rod just flowed between the 2 metals and added some more filler rod accordingly (not so sure of the percentages of metals in the rod but pretty much just used what you would use for domestic copper plumbing)
quick test fit of the thermal switch, you may notice its one from a magna only difference is this one kicks in about 10 degrees C earlier than the stock magna one.


welds nice and strong put this in the vice and tried to over tighten a bolt with full intention to break the weld but snapped the bolt head clean off and almost injured my self in the process.
installed, wiring is only mocked up at the moment for testing

was originally gonna stick in the top radiator hose but there's actually a lot more logic to it being in the bottom hose some may disagree but hey, each to his own.
quick video of it running
http://s541.photobucket.com/albums/gg38 ... switch.mp4
M.B
So pretty much all wiring in the engine bay is complete and am in the process of making brackets for the windscreen washer bottle and radiator overflow bottle.
Had one more wire left to connect which was the one from the thermal fan relay.. now its finally connected and thermal fan kicks in beautifully when its needed. pics
Of course I knew I was gonna use a thermal switch to turn the fan on and off and had been thinking of ways to mount it and where to mount it and as I was thinking of ideas I had the engine bay of my magna open when I saw this
that wonderful piece of pipe joining the top radiator hose.
hmm turns out this sucker is actually stainless steel, what the hell right? well any way it wasnt what i was expecting
found a bolt that would thread strait onto the thermal switch and cut it in half ending up with a real nice clean side, bolt as far as I know is regular steel.
clean side of the bolt
so after preparing the surface of the pipe by hammering a section flat sanding some paint off pre drilling and cleaning up my bolt I fired up the oxy and heavily tinned both faces of the metals that are going to be welded together, then placed the bolt on top and heated them both together till the filler rod just flowed between the 2 metals and added some more filler rod accordingly (not so sure of the percentages of metals in the rod but pretty much just used what you would use for domestic copper plumbing)
quick test fit of the thermal switch, you may notice its one from a magna only difference is this one kicks in about 10 degrees C earlier than the stock magna one.
welds nice and strong put this in the vice and tried to over tighten a bolt with full intention to break the weld but snapped the bolt head clean off and almost injured my self in the process.
installed, wiring is only mocked up at the moment for testing
was originally gonna stick in the top radiator hose but there's actually a lot more logic to it being in the bottom hose some may disagree but hey, each to his own.
quick video of it running
http://s541.photobucket.com/albums/gg38 ... switch.mp4
M.B
Last edited by 84GKSIG on Sun Jun 19, 2011 10:31 am, edited 1 time in total.
Re: 84GKSIG Build EFI plus more
i like this build alot
love the custom gauges to!
love the custom gauges to!
Previous owner of a GC Coupe, a few GSRS and random Sigmas.
Converted to the Ultimate Driving Machines
Converted to the Ultimate Driving Machines
Re: 84GKSIG Build EFI plus more
cheers guys, glad you like the gauges, thought id try something different from whats usually done project is on hold for a little while until I do some more research into what paints im going to be using, colour will be the same and don't really wanna use acrylic, so doing some research now into this ISO free 2K paint but not easy to find info online, but have actually seen it get used in some youtube vids so its defiantly out there have to head up to paint supplies some time and rack their brains.
M.B
M.B