Page 1 of 2
1976 LA Lancer 4g63t Build
Posted: Fri Jan 25, 2013 7:34 pm
by ryzor
We'll I thought I'd share my build with all you fellow lancer enthusiasts and hopefully get some feedback and tips to improve it.


Have a 4g63t 6 bolt vr4 engine, seems to be in mint condition (Never actually ran it).

Picked up some bigger 272 cams, Kelford springs and a Turbosmart FPR.

Found a genuine r33 gtr ARC intercooler for cheap, figured it could go upside down because the gtr intake is on the opposite side to the vr4 engine (not sure if this matters, someone with more knowledge tell me please!).

Found some genuine Momo seats for $300, strangely they fit perfectly.

Starion turbo gearbox with welded up short shifter

Would like opinions on what diff and brake/master cylinder set-up I should use, was thinking a shortened Hilux LSD diff and some leaf mounts welded on? Use standard ex lancer front struts with ex gsr vented brake, hub and bigger callipers, and ex gsr rear brakes on the hilux diff? Are there any cheaper better options?
Here is a picture of my standard diff at the moment

Cheers
Re: 1976 LA Lancer 4g63t Build
Posted: Fri Jan 25, 2013 8:22 pm
by 75glnt
hey mate. looks like an honest project. i dont know about the lancers. but in the galants. gh sigma struts are the way to go. if you can find a set of "green legs" (green coloured gh sigma struts) they have adjustable calliper mounts which makes upgrading to larger rotors alot easier. then a bunch down south called hopper stoppers do an au Series 3 front rotors and calipers to suit sigma gh struts. not sure on how much though. i'l try and find the link.
as far as diffs go. i've seen alot of the hilux lsd's so they must be alright? i'm really not sure. i'm too old school with these. i'd go 9" cut down. or a gq patrol diff cut down. lol... overkill in these!
so whats the plans with the lancer? apart from the 4g63? should go hard
Re: 1976 LA Lancer 4g63t Build
Posted: Fri Jan 25, 2013 8:33 pm
by 75glnt
here ya go mate.
http://www.sigma-galant.com/viewtopic.p ... tors#p4395
the comment on the bottom. its a little pricey though. as i just found out.
Re: 1976 LA Lancer 4g63t Build
Posted: Fri Jan 25, 2013 10:32 pm
by ryzor
Thanks for the info bud! Those brakes would be perfect if I had the money to blow, I'm trying to do this build as cheaply as I possibly can while trying to stay with the higher quality parts. I'll look into the GQ patrol diffs, I think I read somewhere that they are a really good fit for the early lancers?
This is going to be my road legal "weekend car". Looking to run about 270kw at the rear wheels maybe increasing that in the future, will have to see how it handles the power.

Re: 1976 LA Lancer 4g63t Build
Posted: Sat Jan 26, 2013 6:49 am
by 75glnt
Haha yea. The ga patrol diff is bigger than the ford 9". 43mm spline vs 33mm. And just a set of gh struts and brakes is a good enough upgrade. I'm not exactly sure what goes into it though. Something about the strut tops have to be the galant/lancer ones. (Going off the lancer struts are the same in the galants). I also think you have to mod the control arms? It also narrows your track. (40mm rings a bell).
I hope someone can correct me if I'm wrong

Are you keeping It that colour? Mags? Etc
Re: 1976 LA Lancer 4g63t Build
Posted: Sat Jan 26, 2013 7:07 am
by ryzor
I have some ex lancer struts and springs. I put the la lancer top hats on them but the metal plates that hold the top of the spring are a bit large for the tunnels and sandwich in, anything I can do about this?
Probably keeping the wheels the same colour but will be painting car a nice gloss black. Bright red callipers and rocker cover for contrast haha.
Re: 1976 LA Lancer 4g63t Build
Posted: Sat Jan 26, 2013 10:50 am
by 75glnt
haha always red calipers!

looks mint!
and all i can think of is enlarge the tunnel? i've seen someone on here (another new member). who has a race car (lancer/galant) and its got larger tunnels. but, i may be wrong?
Re: 1976 LA Lancer 4g63t Build
Posted: Mon Jan 28, 2013 10:28 am
by ryzor
Dat bright orange gearbox lol

Re: 1976 LA Lancer 4g63t Build
Posted: Mon Jan 28, 2013 10:49 am
by GB_BB4C
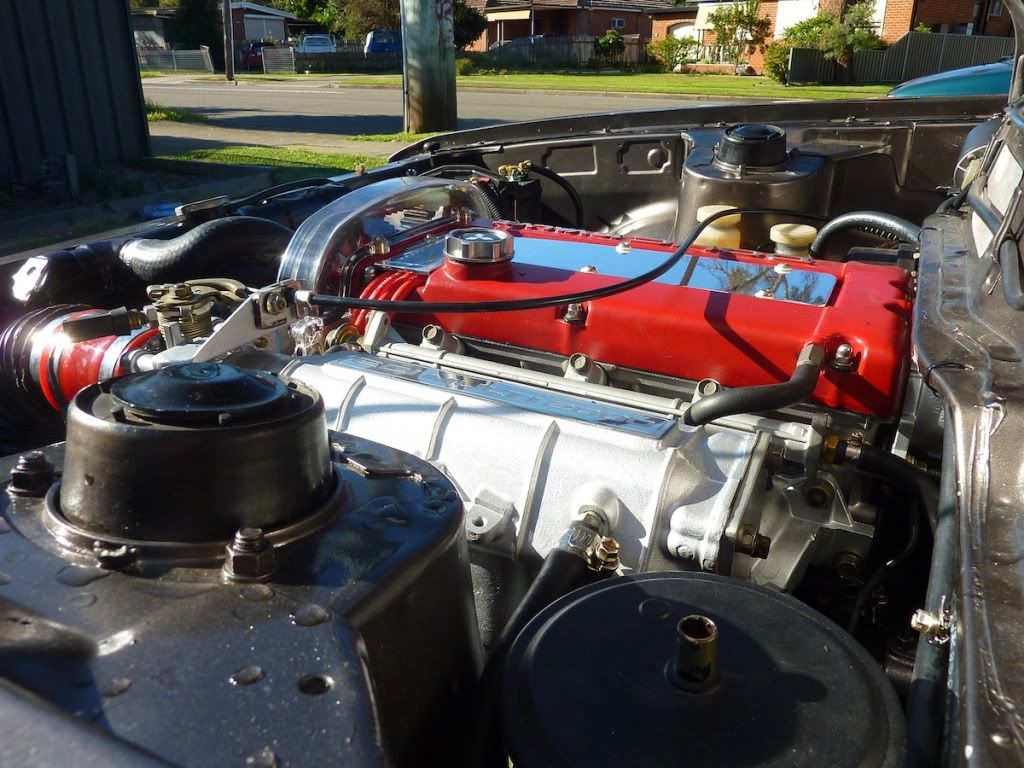
ryzor wrote:Have a 4g63t 6 bolt vr4 engine, seems to be in mint condition (Never actually ran it).
Starion turbo gearbox with welded up short shifter
dont mean to burst ya bubble, but aren't VR4's narrow block, and Straion gearbox's wide.
also Starion boxes have hydraulic clutch not cable.
just looking at the pic and the box looks like a wide Sigma/Scorpion box, have you tried to attatch it to the motor?
Re: 1976 LA Lancer 4g63t Build
Posted: Mon Jan 28, 2013 11:50 am
by ryzor
It's 310mm center bolt to bolt. So def a narrow block gearbox.
I think the wide blocks are from the na 2.6L starions?
Bellhousing has been modified to take sigma starter motor apparently. But maybe it is a sigma box, I'm really not 100% sure.
Re: 1976 LA Lancer 4g63t Build
Posted: Wed Jan 30, 2013 11:08 pm
by 75glnt
It looks like my siggy box. Mines a jap 5speed. It's got the non detachable bell housing and a flat inspection plate on the bottom.
Re: 1976 LA Lancer 4g63t Build
Posted: Wed Jan 30, 2013 11:09 pm
by 75glnt
Oh. And the orange gearbox actually looks cool in a different way! Might do it myself
Re: 1976 LA Lancer 4g63t Build
Posted: Fri Feb 01, 2013 9:14 am
by ryzor
Yeah it actually came out really good. Thought I would paint the gearbox something obnoxious because it will hardly be seen haha. Still have to get a l200 shifter arm and cover plate then swap them over, countless other things I need to get before those though

Re: 1976 LA Lancer 4g63t Build
Posted: Fri Feb 01, 2013 9:21 am
by 75glnt
Lol the joys of a 4g63 conversion
Re: 1976 LA Lancer 4g63t Build
Posted: Fri Feb 01, 2013 10:24 pm
by Tj.
Starions in Aus all had wide block motors but in the states they had a different motor, NZ may have got those models. Don't know much about it though.
I would suggest that you do yourself a favour this early on and try bolt the box up to the motor and make sure the bolt holes in the bottom of the block line up with the gearbox.
What are you going to do about the cam angle sensor and thermostat housing? there's lots of different ways to go about it and I'm always curious to see other peoples approaches.
Re: 1976 LA Lancer 4g63t Build
Posted: Sat Feb 02, 2013 7:11 am
by ryzor
http://www.trademe.co.nz/motors/used-ca ... 543898.htm
These are the Starions we have in nz, I have already measured the block and gearbox bolt holes and they are exactly the same.
Not sure about cas and thermostat yet. Will sit the engine in the car when I have some time and see how much room I have between the firewall and head. These will be some of the last things I get round to doing though.
Re: 1976 LA Lancer 4g63t Build
Posted: Sat Feb 02, 2013 9:05 am
by Tj.
In Galants its tight. In lancers its tighter again.
These will be some of the last things I get round to doing though
At the risk of sounding nit picky you might want to put it at the front of the priorities list. It will completely influence the way you build your motor. If you go one way, you'll need to undo a lot of work and spend more money if you change your mind half way though or find something won't work.
When I did mine I was looking to use as many original parts from the donor motor as I could to keep costs down. I decided early on that all I needed to do was massage the firewall a little (after being told it'd work) I spent weeks lifting the motor in and out and flogging the ever loving shit out of my poor firewall to make it work. Massage is an understatement.
I later learned that there's two types of cas and I had the bigger of the two.
Your other options there involve either running an RVR cas which mounts behind your cam pulley (which might require the RVR ecu to work, not sure) or use an aftermarket crank mounted trigger wheel which will only run with an aftermarket ecu, or so I've been told.
Both of those require the engine to be half apart to fit and if you plan for t now you wont end up with too many superfluous bits.
I used the Jayracing front outlet for the thermostat relocation but youll need to measure it up to make sure theres enough eoom in a lancer engine bay. This also comes with the recommendation of plugging two water jackets between the head and block. Some guys fabricate thin relocation pipe work that bolts onto the original out let and move the thermostat elsewhere. Lots of ways to do that second one.
If you map out the way you're going to make that engine fit before you bolt all the front of it back together it'll save you a lot of hwad aches.
Re: 1976 LA Lancer 4g63t Build
Posted: Sat Feb 02, 2013 10:07 am
by ryzor
Those are some really good points mate, I measured the cas and it sticks out about 45mm from the head. I think it will fit but then again may be a bit too tight.

Have been thinking about a trigger wheel as I will probably go with a megasquirt ecu. Haven't looked into what exactly I will do about the thermostat yet, will sit the engine in and go from there. Head still has to come off, be pulled apart and then skimmed so plugging up those jackets could be the way to go.
Thanks for your help
On another note it saddens me to see the front of your Galant beat up, probably the only other Mitsi I like as much or more than the old lancers

What are yours plans going to be for it now? Have you thought about going down the turbo wrought? Would feel good to leave most skyline lovers in the dust when they pull up next to you with their purple backwards caps and all

Re: 1976 LA Lancer 4g63t Build
Posted: Sat Feb 02, 2013 10:23 am
by A112H
Like the build mate, looks like a tidy little car you are starting with.
The painted gearbox is awesome, will stand out when you open the bonnet
As for the CAS, there is no way it will fit without some serious firewall cutting or really, really heavy hammering.
If you have a look at your pic you will see the breather pipe sticking out of the rocker cover just above the CAS. On the Galant that sits against the firewall with the gearbox in place. And the Lancer is a much shorter engine bay, looking at that pic I would really think the rocker cover will hit the firewall.
I removed the breather, tapped the hole and screwed a bolt in there. I will be running a Wolf 3D and a crank mounted trigger wheel.
As for the water, I bought a Jay Racing kit and it sucks ass, fouls on everything. It will be cut up and used to remotely mount the thermostat of the rear somewhere, probably tucked away under the intake manifold.
Just some more bits for you to think about, lol I haven't finished mine yet but like TJ said, better to get it right first time than waste time and money getting it wrong, like I did
Re: 1976 LA Lancer 4g63t Build
Posted: Sat Feb 02, 2013 10:42 am
by 79_lancer
ryzor wrote:]
Picked up a genuine r33 gtr ARC intercooler cheap, figured it could go upside down because the gtr intake is on the opposite side to the vr4 engine (not sure if this matters, someone with more knowledge tell me please!).
Cheers
i think with inter coolers, (not 100% sure) that the intake is usualy mounted higher than the outlet. i think its something to do with helping air flow as it cools down.... the whole 'hot air rises' thing i.e. the hot air enters at the highest point of intercooler then flows down to the outlet. if the pipe inlet nd outlet are in the same position both sides, i dont think it will matter if its upside down.
just my 2c worth
cheers,
Dave
Re: 1976 LA Lancer 4g63t Build
Posted: Sat Feb 02, 2013 10:43 am
by 79_lancer
Nice build by the way
Re: 1976 LA Lancer 4g63t Build
Posted: Sat Feb 02, 2013 12:11 pm
by Superscan811
79_lancer wrote:i think with inter coolers, (not 100% sure) that the intake is usualy mounted higher than the outlet. i think its something to do with helping air flow as it cools down.... the whole 'hot air rises' thing i.e. the hot air enters at the highest point of intercooler then flows down to the outlet. if the pipe inlet nd outlet are in the same position both sides, i dont think it will matter if its upside down.
just my 2c worth
cheers,
Dave
I'd be more inclined to think that the pipes would be placed close to where the maximum EXTERNAL cooling airflow is.
Internally, the air will take the path of least resistance which is the shortest path (if all the internal fins are the same) between the inlet and outlet. It will also spend the least amount of time there so that is where you would want the IC to cool the best.
Just my thoughts on the matter.
Cheers.
Re: 1976 LA Lancer 4g63t Build
Posted: Sat Feb 02, 2013 12:43 pm
by ryzor
A112H wrote:
I removed the breather, tapped the hole and screwed a bolt in there. I will be running a Wolf 3D and a crank mounted trigger wheel.
As for the water, I bought a Jay Racing kit and it sucks ass, fouls on everything. It will be cut up and used to remotely mount the thermostat of the rear somewhere, probably tucked away under the intake manifold.
This sounds like a good idea. I'll probably do the same, cheers.
Superscan811 wrote:79_lancer wrote:i think with inter coolers, (not 100% sure) that the intake is usualy mounted higher than the outlet. i think its something to do with helping air flow as it cools down.... the whole 'hot air rises' thing i.e. the hot air enters at the highest point of intercooler then flows down to the outlet. if the pipe inlet nd outlet are in the same position both sides, i dont think it will matter if its upside down.
just my 2c worth
cheers,
Dave
I'd be more inclined to think that the pipes would be placed close to where the maximum EXTERNAL cooling airflow is.
Internally, the air will take the path of least resistance which is the shortest path (if all the internal fins are the same) between the inlet and outlet. It will also spend the least amount of time there so that is where you would want the IC to cool the best.
Thanks for the info guys, the inter cooler is quality aluminium and has large 3" in and out so should stay quite cool and non-restrictive?
Re: 1976 LA Lancer 4g63t Build
Posted: Sat Feb 02, 2013 5:22 pm
by Tj.
ryzor wrote:On another note it saddens me to see the front of your Galant beat up, probably the only other Mitsi I like as much or more than the old lancers
What are yours plans going to be for it now? Have you thought about going down the turbo wrought? Would feel good to leave most skyline lovers in the dust when they pull up next to you with their purple backwards caps and all
Thanks man. The out-pouring of support has been a massive boost for me. I was shattered when it happened. But it will be rebuilt. It's just going to take time. and I'm going to stick with N/A. In fact I'm not going to touch the motor until the body has been restored. No point starting one project before another ends.
Here's some shots of how my CAS fits. Like I said,
tight.

This shot is looking at it side on. The plate is blocking off the hole where the heater hoses came through.
Similar angle just further away. It just tucked up under that lip. My breather hose cleared too but it catches on that aforementioned lip when the motor goes in/out.
When I was putting it together I tried putting the motor in on its own and then bolting the gearbox up to it and just couldn't do it. Because there's such little clearance behind the motor that it just will not tilt back in order for you to line the shaft in the gearbox up with the clutch. And adding to that is the fact that the engine is a little front heavy so it'll just tip forward on its own. Major pain in the arse.
I ended up dropping the motor and box in as one unit but I had to unbolt the drag link and push it down out of the way to clear it. Still a pain in the arse but it did go in.
Re: 1976 LA Lancer 4g63t Build
Posted: Sat Feb 02, 2013 10:29 pm
by ryzor
I love the look of your engine. I am going with clear camwheel cover too, and maybe hks cam wheels and cam belt?
Re: 1976 LA Lancer 4g63t Build
Posted: Sat Sep 21, 2013 9:05 am
by ryzor
Things are ticking along, engine and gearbox are sitting in place at the moment, have started to mock everything up in position to see how it fits


This is where the shifter sits after cutting out some of the trans tunnel

People have said the CAS won't fit because it will be sandwiched against the firewall? There seems to be enough room for it to fit, although I won't be able to get it on or off without taking the gearbox off and tilting the engine forward. Can anyone see a reason why I would need to bash the firewall in?

Re: 1976 LA Lancer 4g63t Build
Posted: Sun Sep 22, 2013 12:42 am
by orangelancer
what engine mounts are you using? did you drop the engine in and fab some up? apparently the lancers have more room than the galants? i have a 4g63 for my lc lancer but i havent attempted to fit it up yet. havent had the time
Re: 1976 LA Lancer 4g63t Build
Posted: Sun Sep 22, 2013 11:19 am
by Superscan811
If you can get hold of an RVR head, they have the CAS on the front, behind the cam wheel.

Problem solved.
Cheers.
Re: 1976 LA Lancer 4g63t Build
Posted: Sun Sep 22, 2013 3:35 pm
by ryzor
orangelancer wrote:what engine mounts are you using? did you drop the engine in and fab some up? apparently the lancers have more room than the galants? i have a 4g63 for my lc lancer but i havent attempted to fit it up yet. havent had the time
I used 4g63 (sohc carb) engine mounts from a 1980s l200. Bolt straight in no modification needed. All though I would like to get nolothane versions of the engine mounts, I don't know how strong the ones I have in at the moment will be.
Re: 1976 LA Lancer 4g63t Build
Posted: Thu Nov 07, 2013 1:16 pm
by ryzor
NOLATHANE BUSHES!

First time i've ever bought any, and looking at the quality I highly recommend them

Eww

Much better after a grueling 400/1500 grit wet sand and polish, on a more positive note I think I may have sanded my finger prints off.

Painted the back panel for a more even front to back weight ratio


Repainted the pedal box, re-greased, added a stronger spring and some washers to the accelerator pedal so it doesn't flop around as much

Drilled and fitted the door cards (for door pulls)

Brand new L200 gearbox mount

Gearbox and shifter sit nicely, only modification was cutting out the trans tunnel a little more

The grille and bonnet catch bar had to be modified to fit the intercooler, but it doesn't look too bad??
Would love any feedback as always.
Cheers