Matt's Red GN

Post your build topics here! This is for restorations only.
d3v147
Posts: 137
Joined: Sat Oct 05, 2013 11:57 pm
Location: Tasmania
Contact:

Re: Matt's Red GN

Post by d3v147 »

The left hand front brake line was far too close to the manifold for my liking and also was in the way of the heat shield. I had ordered a 90 degree banjo but it still hadn't arrived. It became apparent I needed a devious plan.
Image
Unfortunately Mitsubishi flare fittings have a lot more thread than nissan ones so the lines would not seal. This was easily rectified by hacking the master cylinder down a bit.
Image
This T piece is from the rear of my S13. I'm not going into the details of why this works perfectly but be assured that it does. Brake feel is actually really good. Car does oversteer on braking just a touch but I like that. It doesn't lock the backs going straight.
Image
Clearly not enough sikaflex used on the sump. I found it's resting on the rack and has to come of for notching anyway.
Image
Because air is mostly nitrogen.
Image
Hopefully an R31 diff will solve the rear fitment problem
Image
Inevitably this would have caught fire.
Image
Excitement was building
Image
(Still not up to date)
User avatar
Tomica93
Posts: 91
Joined: Fri Sep 30, 2011 4:54 am

Re: Matt's Red GN

Post by Tomica93 »

profile pic looks sick, hope the rear wheels will pair with front

also great work on wiring, glad too see you connected all the earth wires into one spot, reminds me on my problem about earth loops

keep going, well done !
d3v147
Posts: 137
Joined: Sat Oct 05, 2013 11:57 pm
Location: Tasmania
Contact:

Re: Matt's Red GN

Post by d3v147 »

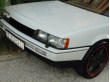
Tomica93 wrote:profile pic looks sick, hope the rear wheels will pair with front

also great work on wiring, glad too see you connected all the earth wires into one spot, reminds me on my problem about earth loops

keep going, well done !
Thanks Tomica! Australian Deilivered Sigmas use live rear axles - so rear camber is not possible without an IRS conversion. I think it's way more trouble than it is worth to go down that path and I'm also not a fan of rear camber. I am likely to chagnge to an R31 skyline diff but that is a big enough job in itself.

This is pretty much as installed as a Megasquirt ever gets! It can definitely live there for a while while I am sorting out extra connections (Knock sense, speed sense, EGT, maybe oil pressure, maybe PWM fuel pump control.
Image

It's unfortunate I couldn't keep the stock column cover as it is the correct colour and looks better IMHO. It also hits the underside of the dash limiting the adjustibility of the tilt. I May have to come back to this later and attack with the 3D printer.
Image

I didn't want any gauges to mount and all the info I needed was available live from the MS. I also didn't want to drill into my dash as it is in immaculate condition. The soulition was to double side tape a large plastic panel to the dash and put 2x stand off in it to simulate the head rest pillars used by a standard tablet mount. It is adequate but I should probably 3D print something that matched the countour of the dash better so the double sided tape does not slowly peel.
Image

It had been quite a while since I had seen the floor.
Image
Image

Works quite well at night at least.
Image

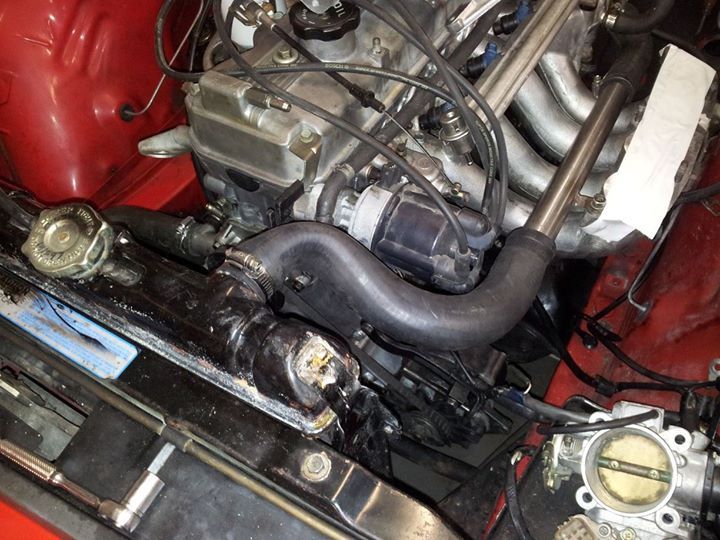
Steering column was touching dump so needed mods.
Image
Image
Done ! Should have added the EGT port while I was there though.
Image

Car was way too loud with only a 3 inch exhaust - you could here the turbo whining driving around off boost - it was like a diesel truck!
Image
Made sure it wasn't going to rattle once welded in place
Image
Installation on an angle ensured it wouldn't rattle. Worked very well! Quieter than the old broken exhaust that started the whole project! Didn't seem to affect the power.
Image
geezer101
Posts: 1869
Joined: Sat Jun 11, 2011 10:49 pm
Location: adelaide (SA)

Re: Matt's Red GN

Post by geezer101 »

Good stuff Matt. The sig looks great! And now you can finally get some time behind the wheel and enjoy it. We'll all be eager to hear how it performs on the road. :thumpsup:
User avatar
ddt
Posts: 669
Joined: Sun Apr 11, 2010 1:17 am
Location: Perth

Re: Matt's Red GN

Post by ddt »

Top work, Matt -she's lookin good :thumpsup:
That's a lot of work done in a short space of time -major props.

How different does it ride and handle now with that rack conversion -are you happy with the result so far?
Any downsides?
Image
'Member's Rides' Link for LIL RED WGN: http://www.sigma-galant.com/viewtopic.php?f=46&t=4742
d3v147
Posts: 137
Joined: Sat Oct 05, 2013 11:57 pm
Location: Tasmania
Contact:

Re: Matt's Red GN

Post by d3v147 »

ddt wrote:Top work, Matt -she's lookin good :thumpsup:
That's a lot of work done in a short space of time -major props.

How different does it ride and handle now with that rack conversion -are you happy with the result so far?
Any downsides?
Thanks DDT. I have devoted a lot of time to this build. Pretty much all my spare time lol.

Ride handling is extremely harsh now. The front suspension are 10kg digressive coilovers intended for use with a 6 CYL in my s13. I keep the dampening to setting 1 and the rebound to setting 3 though and they seem to work really well without skating on uneven surfaces. Rear suspension has a little bounce when unladen, but seems a lot better with a full tank of fuel and the spare wheel in its place.

Steering feel is completely direct. The electric power steering works really well - i'd say better than the direct mechanical S13 pump that used to power the rack. Fee play when going straight is eliminated (Although i need to get a wheel alignment as I think I'm slightly toed out). Turn in even on crappy tires is scary - I initially found myself almost running off the road on the inside as there is no delay. I had trouble with the factory seat not being supportive enough and found myself coming out the side of it a bit. I replaced with a recaro seat which helped a lot.

The 40A stock alternator is a joke. I couldn't even have the fan running without running the battery flat due to the electric power steering. I jury rigged a triton 4g64 alternator I had laying around that was 90A. I can now run everything no problems at all. Strangely enough the motor now shuts off without having to pull the handbrake now :/

Biggest downside is sump clearance. Mitsubishi set the motor VERY low in the sigma. So low in fact that the rack almost sits between big end 3 and 4 when the sump is relieved. Having massaged the sump so much I am now having trouble with it leaking. This leak was getting into the clutch making it slip. (I since sicoflexed the clutch cover plate around the top so it couldn't get in)

Another downside is that to keep the wheel i have I need 5 degrees of negative camber even with the shorter control arms. Whilst I don't mind this, it kind of ruins the sleeper spec of the vehicle a bit. I can try running the the LCA in the other holes that I drilled, but I need to find shorter inner tie rods and am also concerned it may introduce nasty bump steer.

Tune is pretty good - i pinched it from a US starion site. It was a screenshot of megasquirt 12x12 maps. I used excel to spread them out to 16x16 and then adjusted the base fuel to get close. I then let auto tune do the rest. I just left the AFR targets that come with the megasquirt out of the box. Seems to work well and uses less fuel than it did with the magna ECU if I stay off boost.

I need to get knock sensing working but I have a lot of trouble with false alarms.

I am using united 98 RON ethanol blend fuel. It is cheaper than BP ultimate and ethanol is supposed to help prevent knocking as well.
d3v147
Posts: 137
Joined: Sat Oct 05, 2013 11:57 pm
Location: Tasmania
Contact:

Re: Matt's Red GN

Post by d3v147 »

(Update from the past)

The sump was not only leaking but hitting badly in the rack still. One spot is particularly bad near the existing dent to the right and would have worn a hole untreated.
Image

As the sump was already in bad condition I wasn't too elegant with the hammer. Incidentally this lines up with the main bearing which is quite convenient.
Image
Turned the motor by hand after trial fitting the sump. It hit the big end. I fixed this with the hammer.
Image
Got a sump gasket from repco to avoid sicaflex. Turns out the GN has its own sump and we could not get the proper gasket :(
Image
Image
I tried sicaflexing the sump on again. Weather was extremely cold so I left it for 2 days.
In the meantime I made a cover to replace the distributor cap.
Image
Image
geezer101
Posts: 1869
Joined: Sat Jun 11, 2011 10:49 pm
Location: adelaide (SA)

Re: Matt's Red GN

Post by geezer101 »

From one extreme to another - milling a distributor cap delete cover...to modding a sump with the BFH2000 (man, the last time I saw a sump that beat up was on a bush basher). I'm sort of surprised you haven't cut your own sump gasket considering all the other work you have done so far. I think Mitsubishi were well aware of needing to lower the cars centre of gravity (which is good for a production car) but didn't think anyone would be devoted (read as 'crazy') enough to do what you have so far. Hopefully you've killed the oil leak problem :thumpsup:
d3v147
Posts: 137
Joined: Sat Oct 05, 2013 11:57 pm
Location: Tasmania
Contact:

Re: Matt's Red GN

Post by d3v147 »

(Still catching up)

I was rough with the sump as it already had massive damage at the front from the previous owner and there was no point polishing a turd.

After multiple rounds with the BFH2000 the bolt holes no longer lined up with the block :( Being a wierd sump I could not source another one so I cut a slit and applied more hammer massage.
Image
Image
I then cut my own gasket
Image
Image

(Still more to catch up, ps still leaking :()
d3v147
Posts: 137
Joined: Sat Oct 05, 2013 11:57 pm
Location: Tasmania
Contact:

Re: Matt's Red GN

Post by d3v147 »

Should have had the sigma in the drifts! At the drifts was pretty close though!
Image
Image

Quick fix for the replacement seat. It's just an iron on patch
Image
Image

Seat is so much better. Sits lower so i can see the speedo without the steering wheel being in the way, holds me in when turning corners.
Image
User avatar
75wagon
Admin
Posts: 5886
Joined: Sun Apr 12, 2009 5:16 pm
Location: Newcastle/Lake Macquarie

Re: Matt's Red GN

Post by 75wagon »

d3v147 wrote:Seat is so much better. Sits lower so i can see the speedo without the steering wheel being in the way, holds me in when turning corners.
Image
Pretty much the same Recaro's as I'm running in my wagon.
Why don't more invest in good seats?
I've never understood it.
I've got another pair of Recaro's going the my current wagon build as well.

BTW, I'm loving seeing what you are doing with this. Everytime I get on the forum it's 'what has he up to with it now?'

Nice work, be real interesting to see how it drifts too :thumpsup:

Dave...
If you want any sigma-galant.com stickers, then look here for how to get them sigma-galant.com stickers
d3v147
Posts: 137
Joined: Sat Oct 05, 2013 11:57 pm
Location: Tasmania
Contact:

Re: Matt's Red GN

Post by d3v147 »

I really wish I had a pair. Unfortunately only have one.
d3v147
Posts: 137
Joined: Sat Oct 05, 2013 11:57 pm
Location: Tasmania
Contact:

Re: Matt's Red GN

Post by d3v147 »

Finally got to clean the workshop so I could do some work that did not involve getting filthy or catching fire. It did not stay like this for long
Image
I need to pull the windscreen out and do some rust repair as it leaks quite a bit. For this reason I felt it prudent to mount the ECU off the floor.
I just mounted on a piece of MDF. This all fits behind the glovebox no problems as I removed the aircon and replaced the heater duct with the stock item.
Image
Was hoping for completely hidden. I suppose this is near enough. I can probably cover the opeing although you have to get down to see it anyway.
Image
The standard 40A alternator was causing me hassle with all the extra load. I had a 90 4g65 unit in my shed which i jerry rigged. It worked quite well. Only needed 2 of the 4 wires as two of them seem to be for diagnostics.
Image
I wasn't happy with the current tablet mount so i made a new one. Worked well until the sun got on it. I have since started revision 2
Image
d3v147
Posts: 137
Joined: Sat Oct 05, 2013 11:57 pm
Location: Tasmania
Contact:

Re: Matt's Red GN

Post by d3v147 »

As the last mount like to warp in the sun I designed one that I hope will be more rigid.
Image
Image
Image

I had a GM 3 bar map sensor laying around from a broken electronic boost controller I was given. I though i should use it to do realtime barometric correction. I went for a drive around and saw a 5 kpa swing so i think it was worthwhile.
Image

Don't use crappt T3/T4 combo gaskets
Image

Latest problem is that I welded the cross member on 3.5mm off center. Not really a huge discrepancy given my skill level but leaves the camber uneven. I have been slotting the LCA hole on the side with the most camber to bring it back to spec. As I am only correcting on one side this means 7mm worth of slotting as well as shortening my tie rods (Again).

I am looking at doing something about the stereo next. I want to keep it hidden. Does anyone know what the maximum size front speaker that can easily be fitted in the factory dash location? I also need to figure out how to remove the dash without breaking it. It looks like just the top section will come off by itself but I would love some advice on this.
d3v147
Posts: 137
Joined: Sat Oct 05, 2013 11:57 pm
Location: Tasmania
Contact:

Re: Matt's Red GN

Post by d3v147 »

Over 1000 views! Hopefully it's keeping some people entertained!

I have done some work on the audio.

New speakers, also head unit that i never ended up using
Image

Comparison of drivers side speaker. Direct fit apart from pushing hard on vent pipe.
Image

Passenger side fitter, this sucked. The factory speaker is larger on this side. I used some camping mat to seal the hole a bit.
Image

Driver side. I actually added little tweeters and crossovers in here as well but never took any pics.
Image

I decided to build a mixer using a bluetooth audio receiver rather than have a head unit.
Image

Initial wiring. I later changed the left knob to be overall volume rather than front level.
Image

Rough, but it's only temporary
Image

Six RCA to boot. Allows easier tuning. I made the cables up from bits from Jaycar.
Image

I tried to keep it fairly tidy
Image

First sub was a dud so I got another. Firing into rear coner for max loading. Also the only angle it fitted anyway.
Image

I bought some nicer hardware to dress up the panel as it shitted me a little
Image

Plans for v2 as the response curve differs a lot from front to back. May also just use a USB 5.1 sound card with the tablet. Not decided yet. Module at top also has the same BT4 chip as used in V1
Image
d3v147
Posts: 137
Joined: Sat Oct 05, 2013 11:57 pm
Location: Tasmania
Contact:

Re: Matt's Red GN

Post by d3v147 »

Haven't done much with the Sigma, here are some random bits though

Got a 10Hz GPS, naturally 3D printed a mount for it. It was a little bit out but I just heated it with a heat gun and that allowed it to deform nicely.
Image

Played around with CAN BUS in hopes of adding some instruments to my dash. Had a lot of trouble with various electronic gremlins getting this to work.
Image

I got an earth loop and back EMF killed the can chips at both ends. This included the one in the ECU. Luckily only basic soldering skills are needed to repair megasquirt.
Image

I got my EQs and they work a treat! They are only sitting there until I get the MP3/Bluetooth unit and then I will 3D print the whole section. I think I can just pull it off in the build area if i do it at 45 degrees :D
Image

I got another tablet and it is larger and weighs more. I made a reinforcing piece to help with this
Image

I am not a fan of the wanky pod gauges that seem to be in common use. I found these VFD displays in jaycar for $3 each and they are a perfect fit. They also look to be the same colour as the factory clock. Driving them is a PITA and i am doing the long wait for parts to arrive from china to facilitate that. The one in this position will be primarily for (Current AFR, Target AFR, MAP) something like (14.0 14.7 102) as i have 11 digits to play with.
Image

The coil pack bracket eventually fatigued and cracked. I fixed it in a not so pretty fashion. You dont see the bad weld though so it doesn't really matter.
Image
Image

I also had some trouble with the triton alternator. I swapped it out for a magna one I had laying around. I had to swap the pulley and use lots of washers but it was ok. Initially i had it out of alignement and it nearly came off and a bit of wet weather mission. Luckily i didn't lose a head.

Most recently I discovered i was losing coolant. I thought it may have been head gasket so I pulled the plugs and checked with a little camera. Couldn't see any water. I then pressurized the radiator - probably too much as the cap bulged up. It then cracked the neck off a bit. It did look like it was on its way out though. Water obviously began to escape through the crack in the neck, but none in the cylinders which I was happy with. The rubber hose to the hard line that runs around the motor was the culprit. It was leaking even though the clamp was tight. I'm not sure if i'll solder the radiator or put another in.
Superscan811
Posts: 1689
Joined: Sun Mar 22, 2009 4:12 pm
Location: Sydney

Re: Matt's Red GN

Post by Superscan811 »

d3v147 wrote:Most recently I discovered i was losing coolant. I thought it may have been head gasket so I pulled the plugs and checked with a little camera. Couldn't see any water. I then pressurized the radiator - probably too much as the cap bulged up. It then cracked the neck off a bit. It did look like it was on its way out though. Water obviously began to escape through the crack in the neck, but none in the cylinders which I was happy with. The rubber hose to the hard line that runs around the motor was the culprit. It was leaking even though the clamp was tight. I'm not sure if i'll solder the radiator or put another in.
Also pays to check or replace the radiator cap. If they aren't holding pressure, you can lose coolant quicker than you think.


Cheers.
d3v147
Posts: 137
Joined: Sat Oct 05, 2013 11:57 pm
Location: Tasmania
Contact:

Re: Matt's Red GN

Post by d3v147 »

Started modelling the radio panel. I still dont have the audio module to completely figure it out. I copied most of it from the stock panel.
Image

I soldered the top back on the radiator.
Image
Image

I also replaced some of the water hoses and put another small turn on the sump bolts in hope of fixing the eternal leak.

I got parts to repair my tablet so I can do some more work on the tune once I am paid and can afford to fuel it.
User avatar
Sigmaproject
Posts: 1143
Joined: Sun Mar 22, 2009 7:11 am
Location: Maitland NSW

Re: Matt's Red GN

Post by Sigmaproject »

Image


What did you do about the Sigma small rear water port when using the Magna thermostat location. Is it as simple as opening it up with a die grinder..
d3v147
Posts: 137
Joined: Sat Oct 05, 2013 11:57 pm
Location: Tasmania
Contact:

Re: Matt's Red GN

Post by d3v147 »

I put the whole magna head on. I didn't think there was a need to modify anything doing this with an Astron 2 block?
User avatar
Sigmaproject
Posts: 1143
Joined: Sun Mar 22, 2009 7:11 am
Location: Maitland NSW

Re: Matt's Red GN

Post by Sigmaproject »

If you used a magna head..then there are no issues.
Superscan811
Posts: 1689
Joined: Sun Mar 22, 2009 4:12 pm
Location: Sydney

Re: Matt's Red GN

Post by Superscan811 »

While I agree it doesn't seem to happen often, I'd at least put an air bleed on the front water port,
BECAUSE..
Look at the height difference between the rear and front water port, This can trap air, leaving the front of the head without water flow.

Even if it's just a small 2mm bleed into the hose going back to the radiator, it could save you from future head cooking problems.

Just my 2c worth.


Cheers.
d3v147
Posts: 137
Joined: Sat Oct 05, 2013 11:57 pm
Location: Tasmania
Contact:

Re: Matt's Red GN

Post by d3v147 »

Superscan811 wrote:While I agree it doesn't seem to happen often, I'd at least put an air bleed on the front water port,
BECAUSE..
Look at the height difference between the rear and front water port, This can trap air, leaving the front of the head without water flow.

Even if it's just a small 2mm bleed into the hose going back to the radiator, it could save you from future head cooking problems.

Just my 2c worth.


Cheers.
Interesting. I had been bleeding it out from a port near the back of the head but had noticed some gurgling when i stopped the car sometimes. I didn't really think too much of it. I haven't noticed it since I fixed the radiator and leak and I didn't even bother to bleed it last time. I haven't had any problems but I think it's well worth looking into doing the mod you suggested. I can probably just come out the sensor hole for the in dash gauge and back into the stainless pipe. The gauge in the dash doesn't work anyway and I just go off the ECU.
d3v147
Posts: 137
Joined: Sat Oct 05, 2013 11:57 pm
Location: Tasmania
Contact:

Re: Matt's Red GN

Post by d3v147 »

Windscreen was leaking pretty bad so I pulled it out. I just used a cheap box cutter and it was easy.
Image

:( :( :( :( :( :( :( :(
Image

Image

Image

Image

Image

And another leak
Image
d3v147
Posts: 137
Joined: Sat Oct 05, 2013 11:57 pm
Location: Tasmania
Contact:

Re: Matt's Red GN

Post by d3v147 »

Getting ready for the onslaught.
Image

More shitness
Image
Image
Image

sometimes you rally have to ask yourself if it is even worth it. On a positive note I checked the heater core against one on ebay and it looked the same. Pretty cheap at about 140 bucks. While this is all apart I will probably put the aircon back in, albeit with the smaller more efficent compressor I have off a later model triton.
d3v147
Posts: 137
Joined: Sat Oct 05, 2013 11:57 pm
Location: Tasmania
Contact:

Re: Matt's Red GN

Post by d3v147 »

Whoops on the double pic post

PS WHERE THE HELL IS THE EDIT BUTTON? What is this? 1995?
geezer101
Posts: 1869
Joined: Sat Jun 11, 2011 10:49 pm
Location: adelaide (SA)

Re: Matt's Red GN

Post by geezer101 »

d3v147 wrote:Whoops on the double pic post

PS WHERE THE HELL IS THE EDIT BUTTON? What is this? 1995?
Fixed :) And yes, us admins know about the edit button thing and the chosen few have complained - but due to this function being abused it has been removed. As long as the site cops keep doing their funky thing, threads and posts will be kept tidy and there will be free sunshine and rainbows for everyone! :lol:
User avatar
Sigmaproject
Posts: 1143
Joined: Sun Mar 22, 2009 7:11 am
Location: Maitland NSW

Re: Matt's Red GN

Post by Sigmaproject »

It's called DATA RETENTION and can be used against you if the admins think that you maybe involved in subversive activities.

But they would never use it just to spy on you :think:
d3v147
Posts: 137
Joined: Sat Oct 05, 2013 11:57 pm
Location: Tasmania
Contact:

Re: Matt's Red GN

Post by d3v147 »

Facebook has a edit and related history function. The biggest shitheads on the internet also frequent there and no one has died from either function.
d3v147
Posts: 137
Joined: Sat Oct 05, 2013 11:57 pm
Location: Tasmania
Contact:

Re: Matt's Red GN

Post by d3v147 »

I made a curtain to keep fragments of decayed sigma from entering my electronics.
Image

I began cutting, blasting, rust converting grinding and swearing. I have absolutely no idea what I am doing and would love some experienced suggestion of procedure here. I know I should pull the panels right off and do them on the inside but it is only a Sigma and I am not willing to go that far. Maybe oneday when my S13 is off the rotisserie I will give the white GN shell the full treatment but it's not happening on this one.
Image
Post Reply